The most common failure in vegetarian chickpea pie is the Soggy Structural Slump, a demoralizing state where the bottom crust dissolves into a grey paste while the chickpea filling remains a bland, chalky pile of disconnected legumes. This happens because plant-based fillings lack the natural collagen and gelatin of meat-based pies to bind the sauce, leading to massive moisture migration that destroys the pastry. This guide will diagnose every failure mode—from the “Rubbery Lid” to “The Blandness Void”—to ensure your pie achieves a structural and flavorful triumph.
What Perfect Vegetarian Chickpea Pie Actually Looks, Feels, and Tastes Like
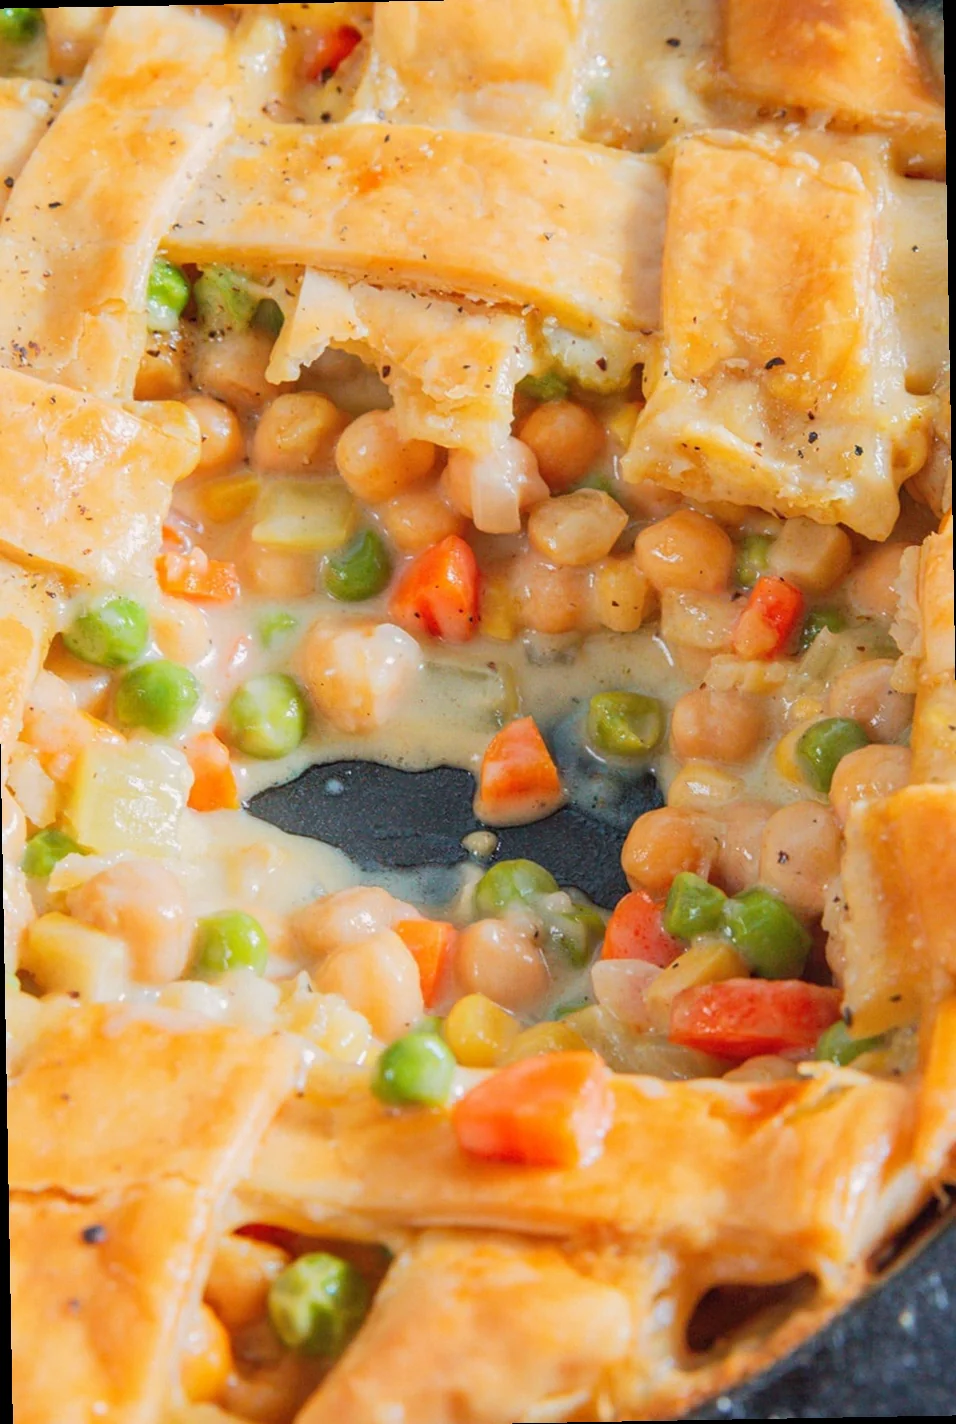
The benchmark for success is a pie that holds its shape when sliced, offering a clear distinction between a crisp, laminated crust and a rich, velvety interior gravy.
| Stage | Success marker — what you should see / feel / smell / hear |
|---|---|
| Raw Assembly | Pastry is matte and cold to the touch (approx. 4°C); filling is a thick, viscous sludge that barely moves when the bowl is tilted. |
| Mid-Cook | A distinct “hiss” of steam escaping the vents; the aroma of toasted flour and savory herbs (thyme/rosemary) fills the room; internal temperature reaches 65°C. |
| At the Finish | The crust is a deep, uniform amber (not pale yellow); the gravy is bubbling lazily through the vents; the surface sounds hollow when tapped with a fingernail. |
| When Serving | The slice stands vertically without the back collapsing; the chickpeas are tender but retain a “pop”; the flavor begins with buttery pastry and finishes with a deep, umami-rich gravy. |
The Ingredient Failures — Wrong Choices Before You Even Start Cooking
- The Chalky Texture Failure: caused by using under-hydrated canned chickpeas straight from the tin → fix: Simmer canned chickpeas in vegetable stock for 15 minutes before assembly, or use dried chickpeas soaked for 12 hours and pressure-cooked until they yield to gentle pressure between two fingers.
- The Blandness Void: caused by relying on standard “vegetable broth” which lacks the savory depth of meat → fix: Incorporate “umami boosters” specifically—15g of white miso paste, 10ml of soy sauce, or 5g of dried porcini mushroom powder per 500ml of liquid.
- The Greasy Separation: caused by using low-fat margarine or “spreads” in the pastry → fix: Use high-quality butter with at least 82% butterfat or a high-quality vegetable shortening (if vegan) kept at exactly 2–4°C.
The Technique Failures — What Goes Wrong During Cooking
- The Moisture Migration (Soggy Bottom): what it looks like: The base of the pie is translucent and wet → caused by raw vegetables (mushrooms, onions, celery) releasing their “water of constitution” inside the oven → fix: All vegetables must be sautéed or roasted until they have lost 30% of their volume before entering the pie shell.
- The Starch Suspension Break: symptom: The gravy looks curdled or watery once cut → cause: Using flour as a thickener without properly “cooking out” the roux or failing to reach the starch gelatinization temperature → fix: Ensure the filling reaches a full boil (100°C) on the stovetop before being added to the pastry, and use a 1:1 ratio of fat to flour for the roux.
- The Rubbery Lid: symptom: The top crust is tough and shrinks away from the edges → cause: Overworking the dough, which develops excess gluten → fix: Pulse dough in a food processor only until “pea-sized” crumbs form; add ice water (0°C) one tablespoon at a time; rest dough in the fridge for at least 60 minutes to relax gluten strands.
- The Great Liquid Leakage: symptom: Filling boils over the sides, ruining the bottom crust → cause: Lack of steam vents or an overfilled dish → fix: Cut at least four 2cm slits in the top crust and leave a 1.5cm “headspace” between the filling and the top of the dish.
The Equipment Failures — When Your Tools Are the Problem
- Glass vs. Ceramic Dishes: Glass conducts heat slowly; if using glass, you will often get a pale, undercooked base. Fix: Use a dark metal pie tin or a heavy-cast iron skillet for maximum heat transfer to the bottom crust.
- The Missing Steam Vent: Without a “pie bird” or a central chimney, steam builds up under the lid, creating a soggy interior. Workaround: If you don’t have a pie bird, insert a small cylinder of parchment paper or a hollow pasta tube (like rigatoni) into the center slit to act as a chimney.
- Inaccurate Oven Thermostats: Most home ovens are off by 10–15°C. A “cold” oven causes the butter in the pastry to melt before the steam can puff the layers. Fix: Use an independent oven thermometer; always preheat to 20°C above your target temperature, then turn it down once the pie is inside.
The Full Recipe — Built Around Preventing Every Failure Above
Ingredients:
- Cold Butter (82% fat) — 225g — Prevents a tough, non-flaky crust by ensuring distinct fat pockets.
- All-Purpose Flour (11% protein) — 350g — Prevents structural collapse while remaining tender.
- Cooked Chickpeas — 450g — Must be tender to prevent “The Desert-Dry Bite.”
- Mashed Chickpeas — 50g (taken from the 450g) — Mashing a portion releases natural starches to prevent a watery gravy.
- Brown Mushrooms (Diced) — 250g — Must be browned to prevent moisture migration.
- Vegetable Stock (High Sodium) — 500ml — Prevents “The Blandness Void.”
- Miso Paste — 1 tbsp — Provides the savory backbone missing from vegetarian fats.
- Cornstarch Slurry — 1 tbsp cornstarch + 2 tbsp water — The “Insurance Policy” against a runny filling.
Method:
- Sauté the aromatics: Cook onions, carrots, and mushrooms in oil until the mushrooms are deeply browned and no liquid remains in the pan. — Prevents Soggy Bottom. Success marker: Veggies should look shrunken and “matte,” not shiny and wet.
- The Roux Phase: Stir in 40g of flour to the vegetables and cook for 3 minutes until it smells like toasted nuts. — Prevents the raw flour taste. Success marker: A golden film forms on the bottom of the pan.
- Liquid Integration: Slowly whisk in the stock and miso paste. Add the chickpeas (whole and mashed). — The mashed chickpeas prevent the filling from being “loose.” Success marker: The liquid should coat the back of a spoon and stay separated when a finger is drawn through it.
- The Cooling Critical Control Point: Allow the filling to cool to room temperature (approx 21°C) before putting it in the pastry. — Putting hot filling in raw pastry causes the butter to melt instantly, ensuring a Soggy Bottom.
- Assembly: Roll out your chilled pastry. Fit the bottom (if using) or just the lid. — Success marker: The pastry should feel cold and slightly stiff, not floppy.
- The Bake: Start at 200°C for 20 minutes to “set” the pastry, then drop to 180°C for the final 25 minutes. — Prevents the crust from melting before it rises.
How to Rescue Chickpea Pie When It Has Already Gone Wrong
- If the filling is a “Soup” after 30 minutes of baking: Carefully peel back a corner of the crust and pour in a “slurry” (1 tsp cornstarch mixed with 1 tsp cold water). Return to the oven. It won’t be perfect, but it will stabilize.
- If the top crust is browning too fast but the middle is cold: Cover the top loosely with aluminum foil (the “shiny side out”) to reflect heat while the interior catches up.
- If the bottom is definitely soggy (The “Pale Paste” scenario): After taking the pie out, let it rest for 15 minutes. If it’s a metal tin, place it directly on a hot stovetop burner for 2 minutes on low heat to “crisp” the base from the bottom up. (Warning: Do NOT do this with glass or ceramic).
Make-Ahead: Which Failures This Introduces and How to Avoid Them
Making chickpea pie ahead of time often leads to Pastry Saturation, where the crust absorbs the gravy during refrigeration.
- The Fix: Store the filling and the raw dough separately. Only assemble the pie the moment you are ready to bake.
- Reheating Failure: Reheating in a microwave causes the pastry to turn into a “Rubbery Sponge.”
- The Protocol: Reheat in a 160°C oven for 15–20 minutes. This dries out the surface moisture and restores the “snap” of the lipids in the crust.
Related topics: Shepherds pie vegetarian recipe · Pudding bottom peach pie recipe · Birr castle potato pie recipe
Diagnostic FAQ — Real Failures, Real Fixes
My pie turned out “mealy” and the chickpeas are hard — what went wrong?
This is the Legume Desiccation Failure. You likely used canned chickpeas without simmering them in the sauce first, or you baked the pie at too high a temperature for too long, evaporating the internal moisture. Next time, braise the chickpeas in the gravy for 10 minutes before assembly.
It looked right but tasted like “wet flour” — where did I go wrong?
You failed to cook the Roux long enough. Raw flour needs heat (approx 80°C+) and time to break down its starch granules. Next time, ensure the flour and fat mixture smells like cookies/biscuits before adding any liquid.
Everything looked perfect until I cut it, then the whole thing ran across the plate. Why?
This is the Gelatinization Failure. You likely didn’t let the pie “rest.” Starch-thickened sauces need to drop to about 60°C to fully set. If you cut it straight from the oven (90°C+), the “bonds” haven’t formed yet. Let the pie sit for 15 minutes before the first cut.