The most devastating failure of the Littice pie crust is the Melted Weave, where the intricate pattern you spent twenty minutes crafting vanishes into a flat, greasy puddle the moment it hits the oven heat. This occurs when the fat-to-flour suspension collapses, leaving you with a tough, greyish slab instead of distinct, shatteringly crisp layers. This guide will diagnose every structural and thermal failure point in the Littice method to ensure your crust maintains its architectural integrity from the counter to the table.
What Perfect Littice Pie Crust Actually Looks, Feels, and Tastes Like
The goal of a Littice crust is “structural flakiness”—the dough must be strong enough to be woven but tender enough to shatter upon contact with a fork.
| Stage | Success marker — what you should see / feel / smell / hear |
|---|---|
| Raw Dough | Cold to the touch; visible “marbling” of butter shards the size of flattened peas; feels like supple, heavy leather, not sticky or crumbly. |
| The Weave | Strips are flexible enough to fold back 180° without snapping; no “grease sheen” on the surface of the dough; temperature remains below 18°C. |
| Mid-Bake | The aroma of toasted hazelnut and browning butter fills the room; the strips should be visibly lifting away from each other as steam creates lamination. |
| Finished | Deep golden-amber hue; “The Snap Test”: a broken strip should reveal distinct, paper-thin internal layers; taste is balanced between salt, cream, and toasted grain. |
The Ingredient Failures — Wrong Choices Before You Even Start Cooking
- The Structural Collapse (Greasy Crust): caused by high-water content in generic supermarket butter (often 18-20% water) → fix: Use European-style cultured butter with a minimum of 82% butterfat. Higher fat ensures the “water-barrier” remains intact during the weave.
- The Leathery Hide (Tough Texture): caused by high-protein bread flour creating excessive gluten strings → fix: Use a low-protein pastry flour or a 50/50 mix of All-Purpose and Cake flour to ensure a tender “short” crumb.
- The Grey Oxidation: caused by slow preparation or alkaline water reacting with flour enzymes → fix: Add 5ml (1 tsp) of Apple Cider Vinegar or Lemon Juice to your ice water. The acidity inhibits gluten development and prevents the dough from turning a dull, unappetizing grey.
The Technique Failures — What Goes Wrong During Cooking
- The Snapping Lattice: What it looks like: The dough strips crack or break when you try to fold them back to start the weave → caused by “Internal Aridity” (too little water) or “Over-Chilling” (butter is too brittle) → fix: Add water 1 tablespoon at a time until the dough holds together when squeezed, and allow the chilled dough to sit at room temperature for exactly 5 minutes before rolling to “relax” the butter.
- The Soggy Bridge: Symptom: The underside of the lattice strips where they touch the fruit remains raw and gummy → cause: “Capillary Seepage” from the filling into the raw dough → fix: Brush the underside of the strips with a thin layer of beaten egg white (the “Protein Seal”) before weaving; this creates a moisture-proof barrier.
- The Shrinking Shingle: Symptom: The lattice strips pull away from the edges of the pie plate, leaving a gap → cause: “Gluten Memory” caused by stretching the strips during the weave → fix: Always “drape” the dough; never pull it. Rest the assembled pie in the freezer for 15 minutes before baking to “lock” the dimensions.
- The Floury Finish: Symptom: Visible white dust or a chalky mouthfeel on the finished crust → cause: Excessive bench flour used during rolling → fix: Use a pastry brush to sweep away every trace of loose flour from both sides of the strips before you begin the weave.
The Equipment Failures — When Your Tools Are the Problem
- The Warm-Hand Syndrome: Your body heat (37°C) melts the butter during the weave, causing a Seized Dough. Fix: Use a metal pastry blender or two knives for the initial mix, and work on a Chilled Marble Slab. If your kitchen is over 22°C, place a baking sheet filled with ice on your workspace for 10 minutes before rolling.
- The Dull Blade Tear: A kitchen knife creates jagged edges that fray and burn. Fix: Use a Fluted Pastry Wheel or a very sharp pizza cutter. The compression of a rolling wheel “cauterizes” the edge of the dough, preventing the layers from splaying out prematurely.
- The Steam Trap: Using a solid baking sheet under the pie can trap moisture. Fix: Bake on a Preheated Pizza Stone or a perforated baking rack placed on the lowest oven shelf. This ensures bottom-up heat (220°C initial blast) to set the crust before the fruit releases its juices.
The Full Recipe — Built Around Preventing Every Failure Above
- All-Purpose Flour (Low Protein) — 320g — Prevents the “Leathery Hide” failure.
- European Butter (82%+ Fat) — 225g — Diced into 1cm cubes and frozen for 15 mins to prevent “Structural Collapse.”
- Ice Water (Filtered) — 60ml to 100ml — Must be 0°C to prevent premature butter melting.
- Apple Cider Vinegar — 5ml — Prevents “Grey Oxidation” and limits gluten.
- Fine Sea Salt — 5g — Dissolved in the water for even distribution (prevents salt “hot spots”).
Method:
- Pulse the Fat: Combine flour and cold butter. Pulse until pieces are the size of peas — prevents Greasy Crust — success marker: The mixture should look like coarse, sandy rubble with distinct flat shards of butter still visible.
- Hydrate Slowly: Drizzle the vinegar-water mix over the flour. Toss with a fork — prevents The Snapping Lattice — success marker: The dough should just barely cling together when pressed in your palm; it should not be a “ball.”
- The Initial Chill (Critical Control Point): Wrap in plastic and refrigerate for at least 2 hours. This is where The Shrinking Shingle is prevented by allowing gluten to relax — success marker: The dough should feel firm but give slightly under thumb pressure.
- The Cold Roll: Roll to 3mm thickness. If the dough feels “springy,” stop and chill for 10 minutes. This prevents Gluten Memory.
- The Precision Cut: Cut strips 2cm wide using a pastry wheel. Brush off excess flour — prevents Floury Finish — success marker: Clean, sharp edges on every strip.
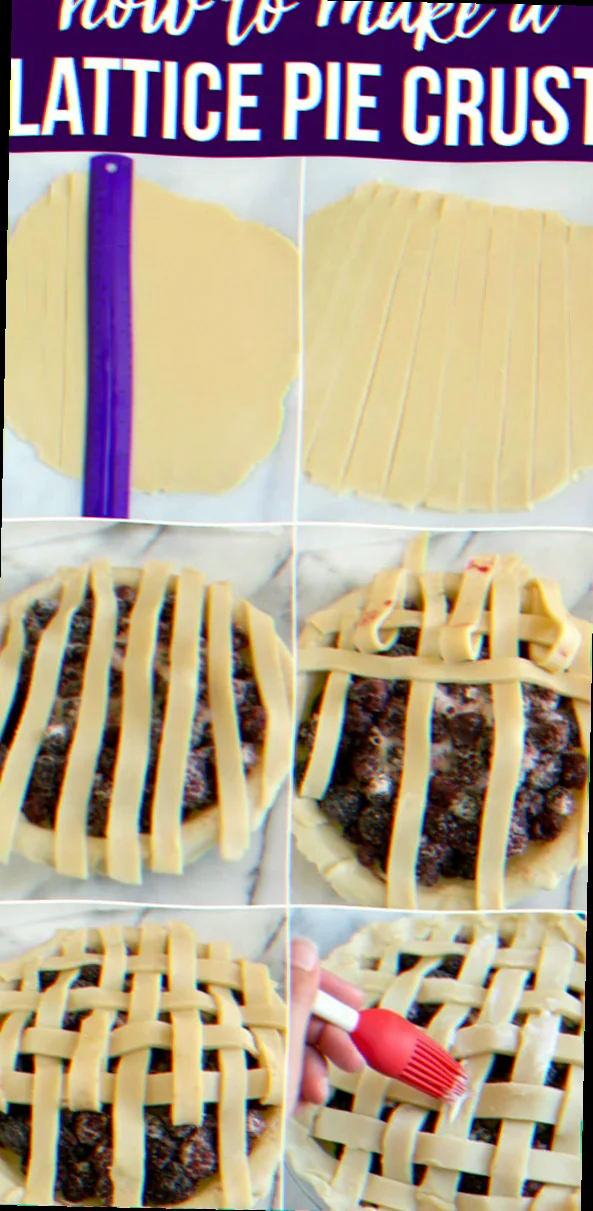
- The Weave: Lay half the strips vertically. Fold every other strip back halfway. Lay a horizontal strip. Unfold the vertical strips. Repeat. Success marker: A tight, geometric pattern with no visible gaps showing the filling beneath the “crossings.”
How to Rescue Littice Pie Crust When It Has Already Gone Wrong
- If the dough is too sticky to roll: Do not add more flour (this causes Tough Hide). Instead, sandwich the dough between two sheets of parchment paper and freeze for 10 minutes. The parchment will absorb some surface moisture while the cold stabilizes the fat.
- If a lattice strip breaks mid-weave: Do not try to “pinch” it back together (this creates a thick, raw lump). Instead, use a “Dough Glue” of 1 drop of water and a small patch of fresh dough, flattened paper-thin, applied to the underside of the break.
- If the crust is browning too fast (The Burnt Rim): This is a thermal failure. Immediately cover the edges with a “Pie Shield” or a ring of aluminum foil. Lower the oven temp by 20°C and move the pie to a lower rack to allow the bottom to catch up.
Make-Ahead: Which Failures This Introduces and How to Avoid Them
Making Littice dough ahead of time risks Enzymatic Grey-Out and Hydration Imbalance (where the flour absorbs too much moisture, becoming gummy).
- Refrigerator Storage: Limit to 48 hours. Store in a vacuum-sealed bag or double-wrapped in professional-grade plastic wrap at 4°C.
- Freezer Storage: To avoid Ice Crystal Rupture (which makes dough mushy when thawed), freeze the dough in a flat disk. To thaw, move to the fridge for 12 hours. Never thaw at room temperature, or the outside will melt while the inside remains a “Butter Brick,” leading to the Snapping Lattice.
Related topics: Turnover recipe with pie crust · Pie crust recipe com · Recipe apple pie crust
Diagnostic FAQ
My crust turned out “short” and crumbly, falling apart like sand — what went wrong?
You have Fat Over-Incorporation. You likely used a food processor for too long, coating every grain of flour in fat so no gluten could form at all. Next time, leave the butter chunks larger—aim for “walnut” size before adding water.
It looked perfect until I took it out, then the bottom was a “Soggy Bridge” — why?
Your oven floor temperature was too low, or your filling was too watery. Use a Pizza Stone and toss your fruit filling with a thickener (like cornstarch or tapioca) and let it sit for 15 minutes, draining excess juice before filling the pie.
The weave looks “blurry” and lost its definition — why?
This is Thermal Creep. The dough was too warm when it entered the oven. The fat melted before the flour structure could “set.” Fix: Always freeze the assembled pie for 15 minutes immediately before baking. This “shocks” the crust into holding its shape.