The first time I made pie crust without yeast, I was aiming for my grandmother’s apple pie, the one with the impossibly flaky, buttery layers that seemed to shatter at the touch. What I got was a pale, tough disc that tasted vaguely of chalk and regret. I spent years chasing that phantom flaky crust, convinced the problem was some elusive ingredient or a secret handshake I hadn’t been taught. It wasn’t until I stumbled upon the gospel of cold, consistent ingredients that my pie crusts transformed from sad, edible frisbees into the golden, tender vessels of deliciousness they are today.
Why Most Versions of Pie Crust Fail
The vast majority of people, myself included for far too long, approach pie crust with the wrong mindset. They think of it as just another dough, something you knead and coax into submission. This is the “bread dough mindset”, and it’s the enemy of flaky pie crust. You end up with a crust that’s tough, dense, and chewy, like a particularly disappointing cracker. It’s got that subtle, but undeniable, rubbery resistance when you cut into it. The flavour is muted, overpowered by the filling, because the crust itself has no character. It’s a vehicle, yes, but a poorly built one. A truly great pie crust, on the other hand, has a delicate crispness, a satisfying tenderness, and a rich, buttery flavour that stands up to any filling. It’s the foundation, not an afterthought.
The Ingredients That Actually Matter
It all starts with what goes into the bowl. My standard, never-fail recipe calls for a precise 240g of all-purpose flour. I used to just grab whatever was on the shelf, but now I reach for a specific brand that I know has a moderate protein content; too much protein, and you’re heading back towards that tough, bread-like texture. The real magic, though, lies in the fat. I’ve experimented with shortening, and while it can offer some tenderness, it lacks the soul and flavour of butter. So, it’s unsalted butter, and here’s the kicker: it has to be ice cold. I mean, almost frozen. I cut 120g of it into small cubes and toss them in the freezer for at least 30 minutes before I even think about touching the flour. And for that ethereal, almost crumbly texture, I add a tiny amount of apple cider vinegar, just 15ml. It seems counterintuitive, but that little bit of acid tenderizes the gluten, making for a more delicate crust. And a pinch of salt, about 5g, is non-negotiable for flavour.
The Moment Everything Changes: Cold, Consistent Ingredients
The revelation, the absolute game-changer, was understanding that cold, consistent ingredients are the cornerstone of a flaky pie crust. It’s not just about putting cold butter in; it’s about everything being cold. The flour needs to be cold. The water, which I use sparingly, about 60-75ml depending on the humidity, has to be ice water. Even the bowl and my hands should be as cool as possible. What’s happening here is science, pure and simple. When you cut cold butter into flour, you create little pockets of fat. As the pie bakes, this butter melts, creating steam. That steam expands, pushing the flour layers apart, and when the steam dissipates, it leaves behind those glorious, flaky layers. If your ingredients are warm, the butter melts into the flour, coating the gluten strands and preventing that separation. You end up with a greasy, dense mess instead of delicate layers.
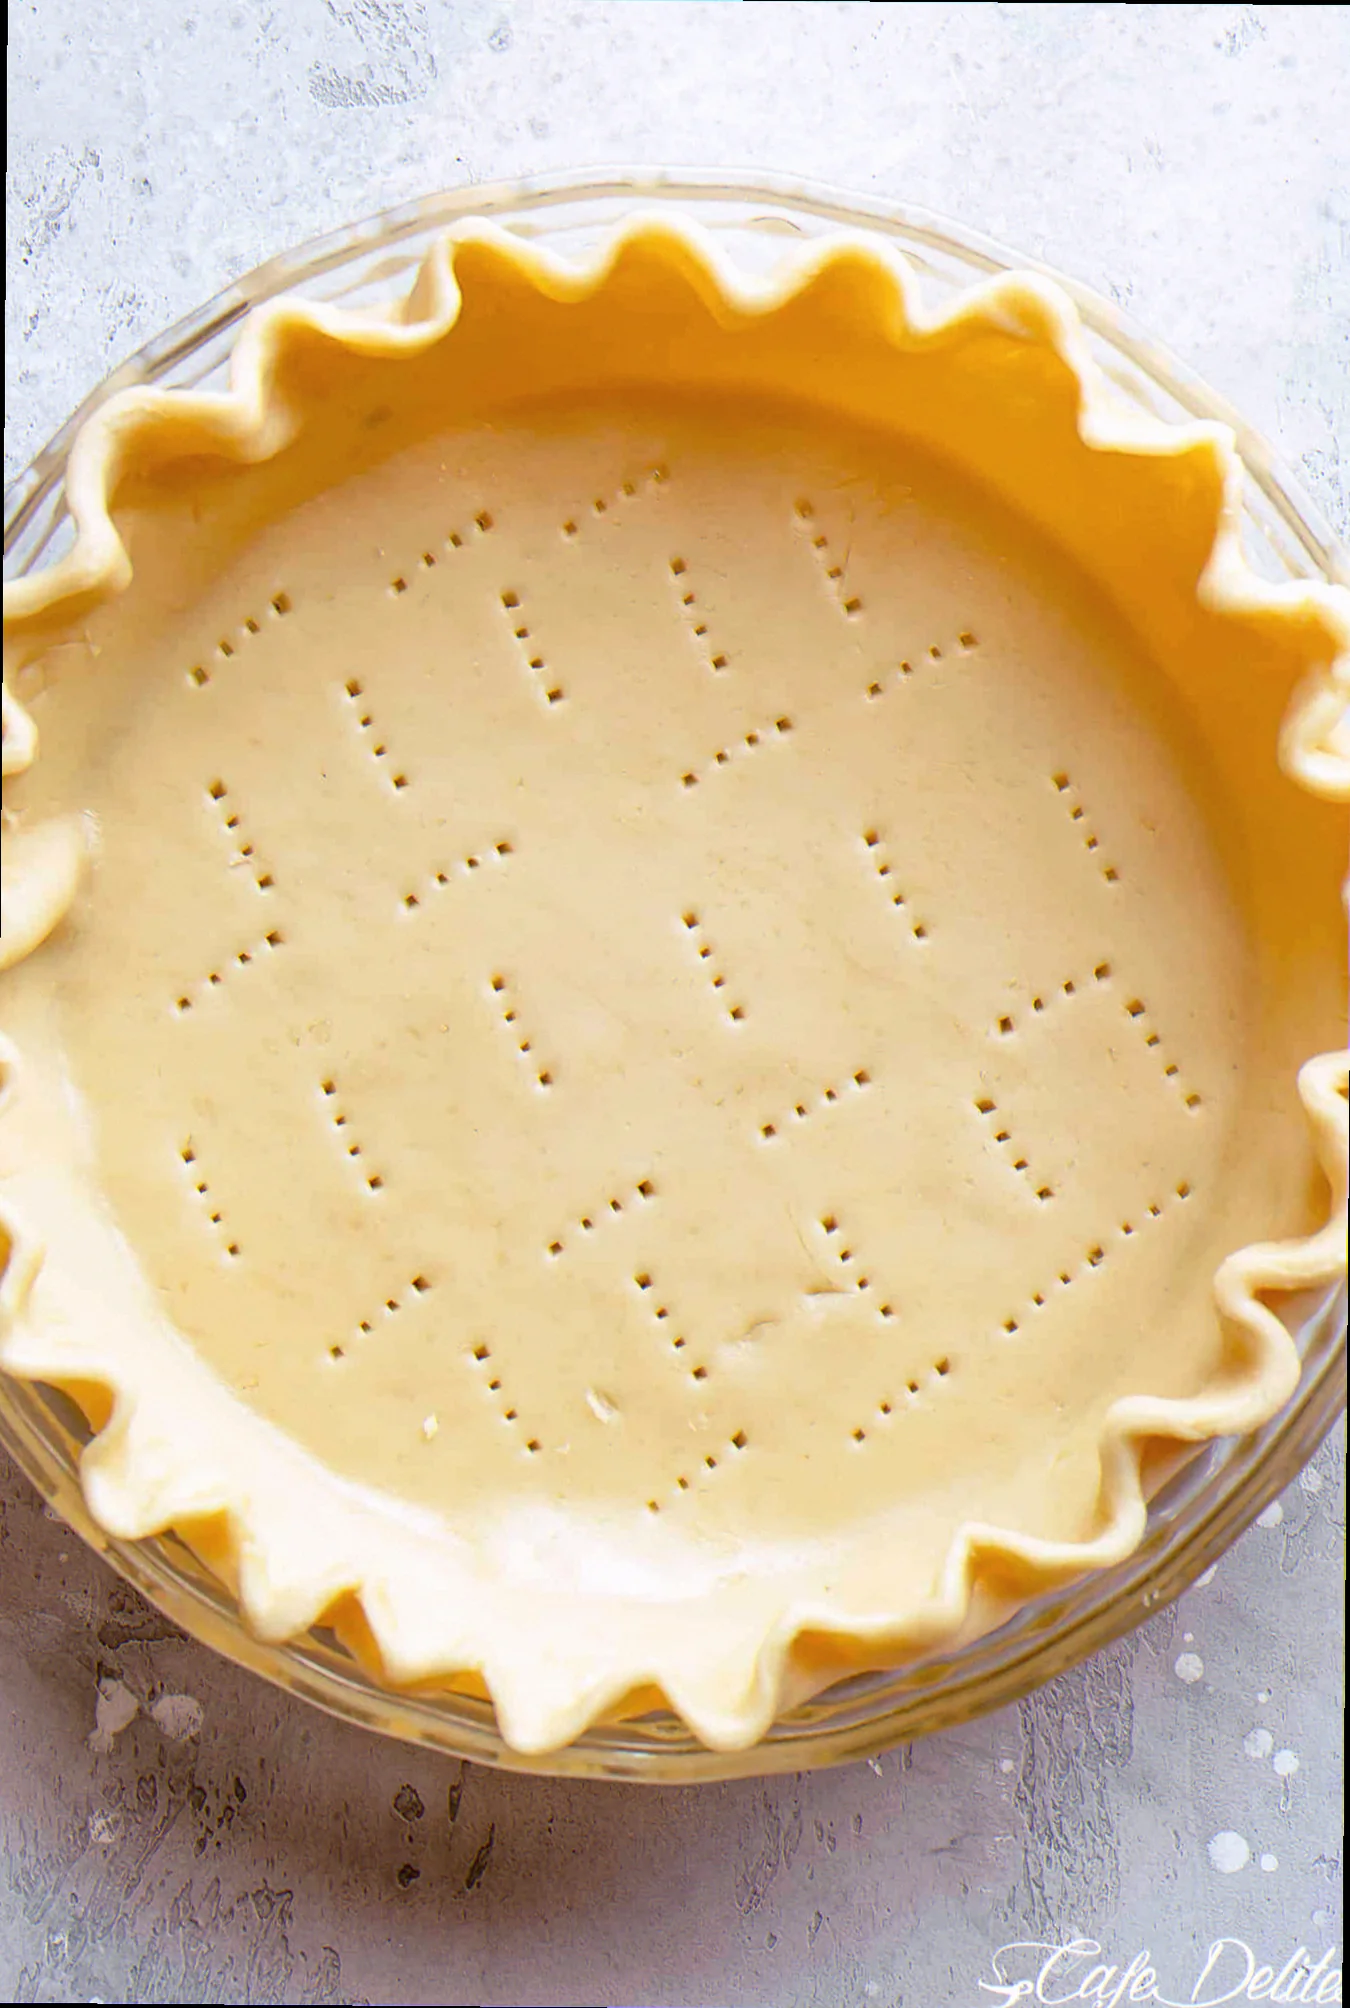
How I Actually Make It Now — Step by Step
The Cold Foundation: I dump my 240g of chilled flour and 5g of salt into a large, very cold mixing bowl. I give it a quick whisk to distribute the salt evenly. Then, I scatter the 120g of ice-cold butter cubes over the flour.
The Pea-Sized Pockets: This is where I get serious about the butter. I use a pastry blender, or sometimes just my fingertips if I’m feeling a bit rustic, and work the butter into the flour. The goal is to get a mixture that resembles coarse meal with some larger, pea-sized pieces of butter still visible. These larger pieces are crucial for flakiness. I’m not trying to make a paste; I’m trying to create distinct pockets of fat. I work quickly, because I don’t want my hands to warm up the butter too much.
The Gentle Hydration: Now for the 15ml of apple cider vinegar, and the ice water. I add the vinegar to the water. I start by drizzling in about 60ml of the ice water, a little at a time, tossing the mixture with a fork. I’m looking for the dough to just start coming together. It should look shaggy and a little dry in places. I don’t want to see a fully formed ball of dough yet. If it feels too dry and crumbly, I’ll add another tablespoon of ice water, but no more. Overwatering is a fast track to toughness.
The Minimalist Bind: Once the dough just starts to clump together, I turn it out onto a lightly floured surface. Here’s the key: minimal handling. I gently bring the dough together with my hands, pressing it into a rough disc. I don’t knead it, I don’t roll it out vigorously. I’m just coaxing it into a cohesive mass. If there are still a few dry bits, that’s fine. I wrap this disc tightly in plastic wrap and then refrigerate it for at least 30 minutes, but ideally an hour. This resting period allows the gluten to relax and the fat to re-chill, both essential for a tender crust.
The Gentle Roll-Out: When it’s time to roll, I work on a lightly floured, cool surface. I roll from the centre outwards, rotating the dough after each turn. I’m aiming for a circle about 30cm in diameter, and about 3mm thick. If the dough starts to crack, I gently press it together. If it’s getting too soft, I pop it back in the fridge for 10 minutes. The goal is even thickness and no tearing.
The Failures I Still See — and How to Fix Them
The Pale, Limp Bottom Crust: This is the classic sign of a bottom crust that hasn’t gotten hot enough, or the filling was too wet. The fix is twofold: pre-bake your bottom crust for about 15 minutes at 200°C before adding the filling, and if your filling is particularly juicy (like berries), consider adding a tablespoon of cornstarch or flour to absorb some of that moisture.
The Tough, Gummy Crust: This usually comes down to overworking the dough and/or using warm ingredients. The gluten has been developed too much, leading to that chewy texture. The fix is simple: embrace the cold, and handle the dough as little as possible. If you’ve already made a tough dough, there’s no real saving it, sadly.
The Cracks and Tears During Rolling: This is usually a sign that the dough is too dry or hasn’t rested long enough after mixing. The fix is to be patient. If it’s too dry, add a tiny bit more ice water, a teaspoon at a time, and let it rest. If it’s cracking, gently press the edges together with your fingers and let it sit for a few minutes before continuing to roll. I’ve had to do this mid-roll more times than I care to admit, and it always works.
When I Make This and What I Serve It With
I make this pie crust for all the big occasions, but especially for my Thanksgiving pecan pie and summer fruit galettes. It’s the unsung hero of those desserts. For Thanksgiving, it cradles a rich, gooey pecan filling, its crispness a perfect counterpoint to the sweet nuts. For galettes, it’s laid bare, supporting a vibrant medley of peaches and berries, its golden hue the star of the show. I love pairing it with a simple, tart green salad with a sharp vinaigrette to cut through the richness of the pie, and sometimes, if I’m feeling decadent, a small scoop of vanilla bean ice cream that melts into the warm crust.
Substitutions I’ve Tested Honestly
Butter → Shortening: I’ve tried it, and while it can yield a tender crust, the flavour is just not the same. Shortening lacks that deep, nutty richness that butter provides. It’s a passable substitute if you absolutely must, but it’s a compromise I rarely make anymore.
All-Purpose Flour → Pastry Flour: This is a winner. Pastry flour has a lower protein content, which results in an even more tender crust. I’ve successfully swapped 1:1 for 240g of pastry flour, and the results are fantastic, even flakier.
Dairy-Free Butter Substitute: This is where things get tricky. I’ve tested several vegan butter sticks, and the results vary wildly. Some create a crust that’s just… okay. Others are too oily or don’t firm up properly. The best I’ve found still doesn’t quite capture the magic of real butter, but for a vegan option, look for a block-style stick that has a high fat content and is designed for baking. It’s a gamble, but sometimes necessary.
Questions I Get Asked About Pie Crust
“My crust is tough, what did I do wrong?”
You overworked it, plain and simple. You treated it like bread dough. Pie crust is about creating distinct layers of fat and flour, not developing gluten. Handle it as little as possible, and keep everything as cold as possible.
“Why does my crust shrink so much when it bakes?”
That’s usually a sign that you didn’t let the dough rest long enough after mixing and rolling. The gluten strands are still tense and they’re contracting in the heat. Always, always let your dough chill properly before rolling and baking. A good 30 minutes in the fridge is the absolute minimum.
Related topics: Pie crust recipe com · Cooked chicken pie recipes · Littice pie crust recipe
“Can I make pie crust dough ahead of time?”
Absolutely! This is one of my favourite make-ahead strategies. Once you’ve made the dough and formed it into a disc, I wrap it tightly in plastic wrap and then in foil, and it will keep in the refrigerator for up to 3 days. For longer storage, I freeze it, well-wrapped, for up to 3 months. Just make sure to thaw it in the refrigerator overnight before rolling. It’s a lifesaver on busy baking days.