The most devastating failure of a chicken and asparagus pie is the Soup-and-Sodden-Sponge Syndrome: a dish where the bottom pastry is a raw, gray paste and the filling has the consistency of a thin, watery broth. This occurs when moisture management fails, turning what should be a crisp, structural masterpiece into a structural collapse. This guide will diagnose every potential failure point—from the “Asparagus Bleed” to the “Rubbery Roux”—to ensure your next attempt achieves a structural and culinary triumph.
What Perfect Chicken and Asparagus Pie Actually Looks, Feels, and Tastes Like
Before you pick up a knife, you must understand the sensory benchmarks of success. A perfect pie is a study in contrast: the resistance of the pastry against the velvet of the sauce.
| Stage | Success marker — what you should see / feel / smell / hear |
|---|---|
| The Filling Prep | Chicken is seared but translucent in the center; asparagus is bright, neon green and “snaps” when bent. |
| The Sauce Base | A “nappe” consistency: the sauce is thick enough to coat the back of a spoon; when you draw a finger through it, the line remains distinct and does not run. |
| The Bake (Mid-point) | The smell of toasted butter and roasting poultry; the filling should be visibly bubbling through the steam vents at 100°C. |
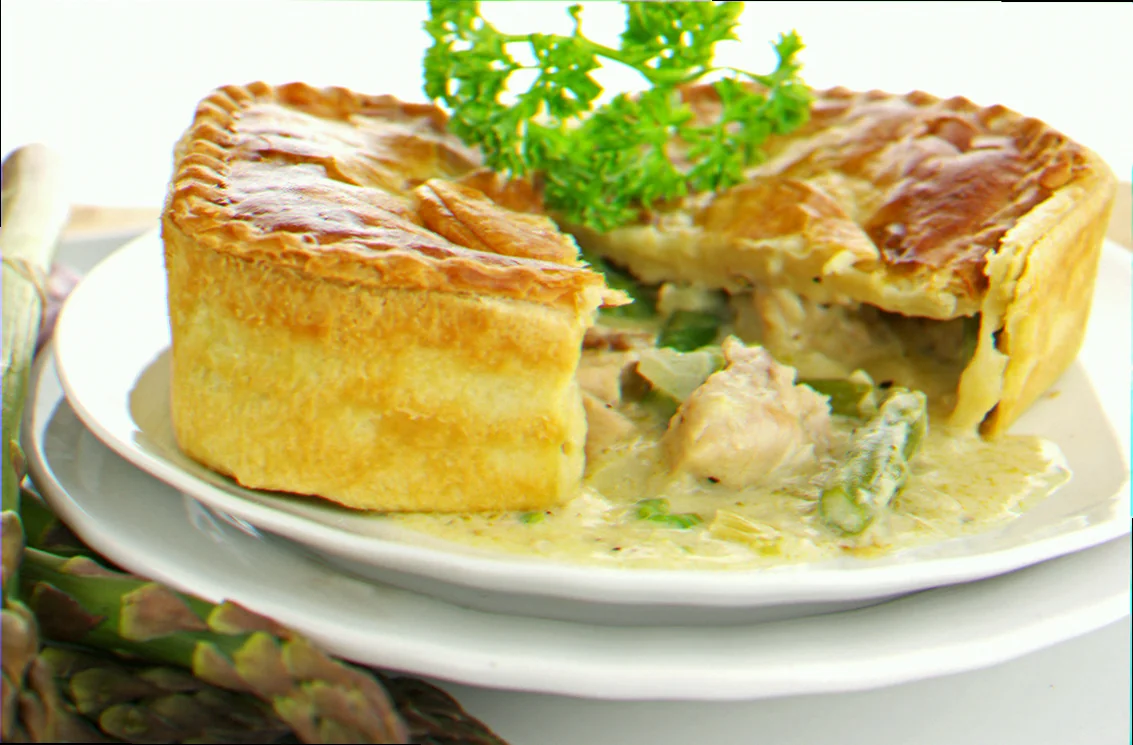
| The Finished Pie | Pastry is a deep, burnished gold (GGB: Golden, Great, and Brown); it shatters audibly when tapped with a knife. |
| The Serving | The sauce holds its shape on the plate for at least 30 seconds before slowly spreading; the chicken is succulent and the asparagus is tender-crisp, not mushy. |
The Ingredient Failures — Wrong Choices Before You Even Start Cooking
- The Rubbery Shred (Meat Failure): caused by using lean chicken breast → fix: 600g skinless, boneless chicken thighs. Thigh meat contains more connective tissue and fat, which lubricates the meat during the high-heat baking process, preventing the “dry wood” texture of overcooked breast.
- The Woody String (Vegetable Failure): caused by using large, thick-diameter asparagus without trimming → fix: 250g “pencil” asparagus or medium spears. If using medium spears, you must snap them at their natural breaking point and peel the bottom 2 inches with a vegetable peeler to remove the lignified, indigestible exterior.
- The Greasy Collapse (Pastry Failure): caused by using “Puff Pastry” made with vegetable oils or margarine → fix: All-butter puff pastry (minimum 25% butter content). Vegetable fat melts at a lower temperature, causing the pastry to slump into the filling rather than rising into distinct, crisp layers.
The Technique Failures — What Goes Wrong During Cooking
- The Asparagus Bleed: The filling turns watery and thin after 15 minutes in the oven.
- Symptom: A pool of green-tinted liquid at the bottom of the dish.
- Cause: Adding raw asparagus directly to the sauce. Asparagus is 90% water; as it cooks, the cell walls collapse and release that water into your sauce.
- Fix: Blanch the asparagus for exactly 60 seconds in boiling salted water, then shock in ice water and pat dry with a towel before adding to the filling. This “sets” the moisture.
- The Raw Flour Aftertaste: The sauce tastes chalky and lacks depth.
- Symptom: A grainy tongue-feel.
- Cause: Failing to cook the roux (butter and flour) long enough.
- Fix: Once the flour is added to the melted butter, cook it on medium heat for at least 3 minutes until it smells like toasted biscuits and turns a pale straw color before adding any liquid.
- The Steam Trap (The Soggy Lid): The pastry stays doughy on the underside.
- Symptom: The top looks brown, but the layer touching the chicken is raw.
- Cause: Lack of ventilation.
- Fix: You must cut at least three 2cm slits in the center of the pastry lid. This allows the internal steam (from the bubbling sauce) to escape rather than hydrating the bottom of the crust.
- The Roux Clump: The sauce is lumpy and inconsistent.
- Symptom: Small “flour bombs” that explode when bitten.
- Cause: Adding cold stock to a hot roux too quickly.
- Fix: Use room temperature or warm stock (approx 40°C) and add it 50ml at a time, whisking vigorously into a paste before adding the next splash.
The Equipment Failures — When Your Tools Are the Problem
- The Deep-Dish Trap: Using a dish that is too deep (over 6cm) causes the chicken at the bottom to remain undercooked while the pastry burns. Use a wide, shallow ceramic or glass pie dish (approx. 24cm diameter, 5cm depth) to ensure even heat distribution.
- The Missing Seal: Failing to use a rimmed dish. If your dish has no flat rim, the pastry has nothing to “grip” onto. As it shrinks in the oven, it will fall into the sauce. If you don’t have a rimmed dish, use a Pie Funnel in the center to support the weight of the pastry.
- The Guesswork Bake: Using a standard oven timer instead of a Digital Probe Thermometer. The pie is only safe and “set” when the internal temperature of the filling reaches 74°C (165°F).
The Full Recipe — Built Around Preventing Every Failure Above
- 600g Chicken Thighs (cut into 3cm chunks) — Prevents dryness.
- 250g Trimmed Asparagus (blanched and dried) — Prevents the “Asparagus Bleed.”
- 50g Unsalted Butter — Provides the fat for the roux.
- 50g All-purpose Flour — Provides the structure for the sauce.
- 500ml High-quality Chicken Stock (warm) — Prevents clumping.
- 100ml Heavy Cream — Stabilizes the sauce and prevents “splitting.”
- 1 tbsp Dijon Mustard — Acts as an emulsifier to keep the sauce smooth.
- 320g All-butter Puff Pastry (chilled) — Ensures a crisp, high rise.
- 1 Egg + 1 tbsp Milk (beaten) — For the “GGB” finish.
Method:
- Sear the Chicken: In a wide pan, sear the chicken chunks in a tablespoon of oil for 4 minutes. Success marker: The chicken should be browned on the outside but still pink in the middle. Remove and set aside. (This prevents the chicken from overcooking during the final bake).
- The Roux Construction: Melt 50g butter, whisk in 50g flour. Cook for 3 minutes until it smells like shortbread. Failure prevented: This eliminates the “Raw Flour Aftertaste.”
- The Liquid Build: Slowly whisk in the 500ml warm stock in small increments. Once smooth, stir in the cream and mustard. Success marker: The sauce should be thick enough to leave a trail when the whisk is moved through it.
- The Filling Assembly: Fold the chicken, the blanched asparagus, and any juices from the chicken plate into the sauce. Season heavily with black pepper. Success marker: The filling should look like a thick stew, not a soup.
- The Chilling (Critical Control Point): Pour the filling into the pie dish and let it cool completely for at least 30 minutes before adding the pastry. If you put cold pastry on a hot filling, the fat in the pastry will melt instantly. Failure prevented: Eliminates the “Soggy Lid.”
- The Lid Application: Drape the chilled pastry over the rimmed dish. Press firmly to the rim with a fork. Cut 3 large steam vents. Brush with the egg wash.
- The Final Bake: Bake at 200°C (400°F) for 25–30 minutes. Success marker: The pastry should have risen by at least 2cm and the filling should be audibly bubbling. Internal temp: 74°C.
How to Rescue Chicken and Asparagus Pie When It Has Already Gone Wrong
- If the filling is too runny after baking: You cannot easily fix this without ruining the pastry. However, you can carefully lift the pastry lid off, pour the liquid into a saucepan, whisk in a “slurry” (1 tsp cornstarch + 1 tsp cold water), boil it for 1 minute to thicken, pour it back in, and replace the lid.
- If the pastry is browning too fast but the middle is cold: Cover the edges of the pie with aluminum foil to reflect heat and drop the oven temperature to 170°C. This allows the interior to catch up without burning the exterior.
- If the bottom is soggy (for double-crust pies): This is a catastrophic failure that cannot be fully reversed. To salvage, serve the pie as “deconstructed”—scoop out the filling and the top crust, and discard the sodden bottom.
Make-Ahead: Which Failures This Introduces and How to Avoid Them
Making the filling a day early is a professional move, but it introduces the “Gelatin Stiffening” failure.
- The Failure: The cold filling is a solid block of jelly, making it hard to judge if it’s heating through.
- The Fix: Take the filling out of the fridge 1 hour before baking to take the chill off.
- Storage Protocol: Store the filling and the pastry separately. Never store a “raw” pie with the pastry already on top for more than 4 hours; the moisture from the sauce will hydrate the pastry, ensuring a soggy result. Store filling in an airtight container at 4°C for up to 2 days.
Related topics: Cooked chicken pie recipes · Recipes on chalkboards apple pie · Recipes made with lemon pie filling
Diagnostic FAQ
My pie turned out watery, even though I followed the roux measurements. Why?
You likely didn’t blanch the asparagus. Asparagus releases nearly 2 tablespoons of water per 100g during cooking. If that water isn’t “locked in” or cooked out beforehand, it will dilute your roux-based sauce.
It looked right but tasted bland. Where did I go wrong?
Chicken and asparagus both require significant acid and salt. If you didn’t add the Dijon mustard or a squeeze of lemon juice, the fats in the butter and cream will mute the flavors. Always taste the filling before putting the lid on.
Everything looked perfect until I cut it—then the sauce ran everywhere.
You didn’t let the pie rest. A pie needs 10 minutes of resting time out of the oven. This allows the starches in the sauce to “re-gel” as the temperature drops slightly. If you cut it immediately at 100°C, the sauce will be at its most fluid.