The first time I made a frozen apple pie from scratch, I was aiming for a showstopper for my parents’ anniversary. I wanted that deep, burnished crust, the filling bubbling with sweet, tender apples. Instead, I pulled out a pie that was simultaneously burnt on the edges and stubbornly pale in the middle, with a filling that was somehow both watery and hard. It was a culinary crime scene, and my revelation came years later, born from sheer desperation: frozen pies need to be blind-baked.
Why Most Versions of Frozen Pies Fail
The cardinal sin, the one I see everyone commit, is the “bake it all at once” approach. People shove a whole, unbaked frozen pie into a hot oven and expect magic. What they get is a pale, undercooked bottom crust that tastes like raw flour and cardboard, while the top burns into a bitter, charcoal-like shell. The filling, exposed to intense heat for too long, either evaporates into nothing or seeps out, creating a soggy mess at the bottom. My first attempts tasted like disappointment and regret, a stark contrast to the crisp, golden bottom and gooey, flavourful filling that I now know is achievable.
The Ingredients That Actually Matter
For me, the hero is always the apples. I’m a purist; I avoid the mushy, waterlogged varieties. My go-to is a mix of tart Granny Smiths for structure and a touch of sharpness, and sweet Honeycrisps for that perfect tender bite and underlying sweetness. I’ll use about 1.2 kilograms of apples, sliced about 5mm thick. Then there’s the unsalted butter, roughly 200g of it, cut into cubes and kept ice-cold. It’s the fat that makes the crust shatter. And for the filling’s binding magic, I rely on a combination of granulated sugar (around 150g, adjusted for apple sweetness) and a good cornstarch (about 30g), which thickens without clouding the filling. A whisper of cinnamon (5g) and a grating of fresh nutmeg (2g) are non-negotiable for that warm, spiced aroma.
The Moment Everything Changes: Blind Baking
The single insight that transformed my frozen pie game, the revelation that saved me from a life of soggy bottoms and burnt tops, was blind baking the bottom crust. This isn’t just a step; it’s the foundation of success. Without blind baking, the bottom crust is essentially steamed by the filling’s moisture and the oven’s humidity. It never gets a chance to crisp up. Blind baking means pre-baking the bottom crust before you add the filling. It sets the structure, drives out excess moisture, and ensures that glorious, flaky texture from top to bottom. It’s the difference between a pie that’s edible and one that’s truly sublime.
How I Actually Make It Now — Step by Step
Here’s how I pull off a truly magnificent frozen pie.
Preparing the Dough: I start with my favourite all-butter pie dough, which I always make ahead and chill for at least an hour, ideally overnight. I roll out one disc for the bottom, about 3mm thick, and gently press it into my 23cm pie plate. I trim the edges, leaving a little overhang, and then chill the lined plate for another 30 minutes. This prevents shrinkage.
Blind Baking the Bottom: This is where the magic begins. I preheat my oven to 200°C. I line the chilled dough with parchment paper, filling it completely with pie weights (or dried beans if I’m out). I bake for 20 minutes until the edges just start to turn golden. Then, I carefully remove the parchment and weights and bake for another 10-15 minutes, until the bottom is dry and lightly golden. This is the crucial step.
Making the Filling: While the crust is blind baking, I toss my sliced apples with the sugar, cornstarch, cinnamon, nutmeg, and a pinch of salt. I let it sit for about 10 minutes, allowing the sugar to draw out some juice.
Filling the Pie: I pull the partially baked crust from the oven. I carefully spoon the apple mixture into the warm crust, mounding it slightly in the centre. I dot the top with about 50g of small cubes of cold butter.
Adding the Top Crust: I roll out the second disc of dough for the top. I can do a full crust, a lattice, or cut out decorative shapes. I lay the top crust over the filling, trim the edges, and crimp them securely to the bottom crust. I make several slits in the top crust to allow steam to escape.
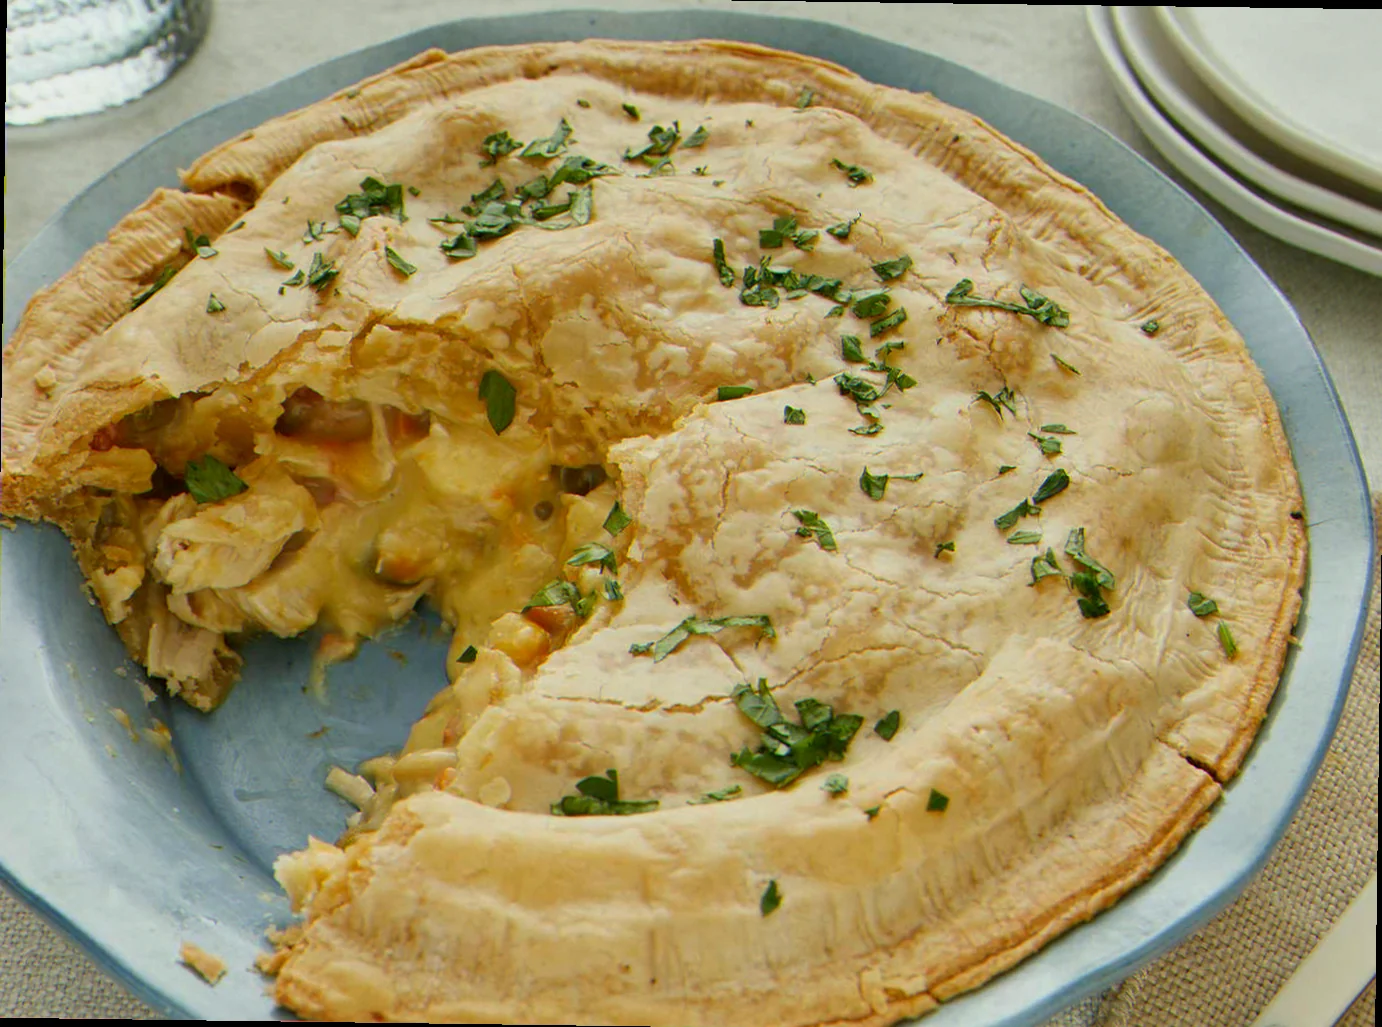
The Final Bake: I brush the top crust with an egg wash (one egg beaten with a tablespoon of water) for that beautiful sheen and sprinkle it with a little extra granulated sugar. I lower the oven temperature to 190°C and bake the pie for about 40-50 minutes. I’m watching for the crust to turn a deep, golden brown and for the filling to be visibly bubbling through the vents. If the edges start to brown too quickly, I’ll loosely tent the pie with foil.
Cooling is Key: This is a tough one for me, but I let the pie cool completely on a wire rack for at least 3-4 hours. This allows the filling to set up properly. Cutting into a hot pie is a recipe for disaster.
The Failures I Still See — and How to Fix Them
- Watery Filling: This happens when you don’t use enough thickener (cornstarch or flour) or if your apples are too wet. Always drain off any excess liquid that pools at the bottom of the apple bowl before filling the pie, and make sure you’re using apples that hold their shape.
- Burnt Edges, Raw Centre: This is the classic “bake it all at once” problem. Blind baking the bottom crust is the only true solution. For the top, if it’s browning too fast, loosely tent the whole pie with aluminum foil.
- Tough Bottom Crust: This is a direct result of not blind baking. The moisture from the filling steams the bottom crust, making it flabby. There’s no quick fix once it’s happened, but blind baking eliminates this issue entirely.
When I Make This and What I Serve It With
I make a frozen apple pie whenever the craving for comforting, nostalgic flavour strikes, but it truly shines during Thanksgiving and Christmas. It’s the perfect finale to a rich, savoury meal. I love serving it warm, with a generous dollop of vanilla bean ice cream – the contrast of warm pie and cold ice cream is divine. Sometimes, I’ll opt for a light, unsweetened whipped cream to let the apple and spice flavours really sing. It’s a dessert that feels both special and incredibly homey.
Substitutions I’ve Tested Honestly
- Granny Smith Apples → Fuji Apples: I tried this once for a sweeter pie. The Fuji apples got a bit softer, and the overall flavour was less complex. It worked, but I missed the tartness and structure of the Granny Smiths. It’s acceptable if you prefer a sweeter pie, but not my preference.
- Cornstarch → Flour for Thickener: I’ve used all-purpose flour in a pinch. It works, but it can sometimes give the filling a slightly cloudy appearance and a less clean flavour. Cornstarch is my non-negotiable for clarity and taste.
- Dairy-Free Pie Crust: I’ve experimented with vegan butter substitutes in my pie dough. It can work, but the flakiness is never quite the same. The texture is often a bit gummier. It’s a passable option if you absolutely need dairy-free, but it’s not a true replacement for butter.
Questions I Get Asked About Frozen Pies
My pie filling is always too liquidy, even after baking. What am I doing wrong?
You’re likely not using enough thickener, or your apples are too wet. Make sure you’re measuring your cornstarch accurately (30g is a good starting point for 1.2kg of apples) and, crucially, drain off any excess juice that collects in the bowl after you toss the apples with sugar and spices. Let it sit for 10 minutes, then pour off the liquid before filling the pie.
How can I get that perfectly golden, crispy bottom crust without burning the top?
This is the question blind baking was invented to answer! You must blind bake your bottom crust. Preheat your oven to 200°C, line your unbaked crust with parchment and pie weights, bake for 20 minutes, remove the weights and parchment, and bake for another 10-15 minutes until the bottom looks dry and faintly golden. This pre-baking is non-negotiable for a perfect pie.
Related topics: Recipe for frozen pies · Apples for apple pies · Recipes made with lemon pie filling
My lattice top always looks messy and the strips fall apart. Any tips?
The trick is to keep your dough cold and not overwork it. Roll out your strips on a lightly floured surface, about 3mm thick. If the dough becomes soft or sticky, pop it back in the fridge for 15 minutes before weaving. When you lay the strips, be gentle. For the edges, make sure you have a good overhang from the bottom crust. Trim them so they’re roughly the same length, then fold the bottom crust’s overhang over the lattice strips and crimp them together firmly. This seals everything and gives a clean edge.