The most common failure in “Recipes on chalkboards” style apple pie is the Soup Slump. This occurs when the first slice is removed and the entire structural integrity of the filling collapses into a puddle of thin, sugary juice, leaving behind a hollow cavern of crust and mushy fruit. This diagnostic guide will identify the specific failure modes—from the “Leathery Lid” to the “Soggy Bottom”—and provide the clinical corrections required to achieve a perfect bake.
What Perfect Recipes on Chalkboards Apple Pie Actually Looks, Feels, and Tastes Like
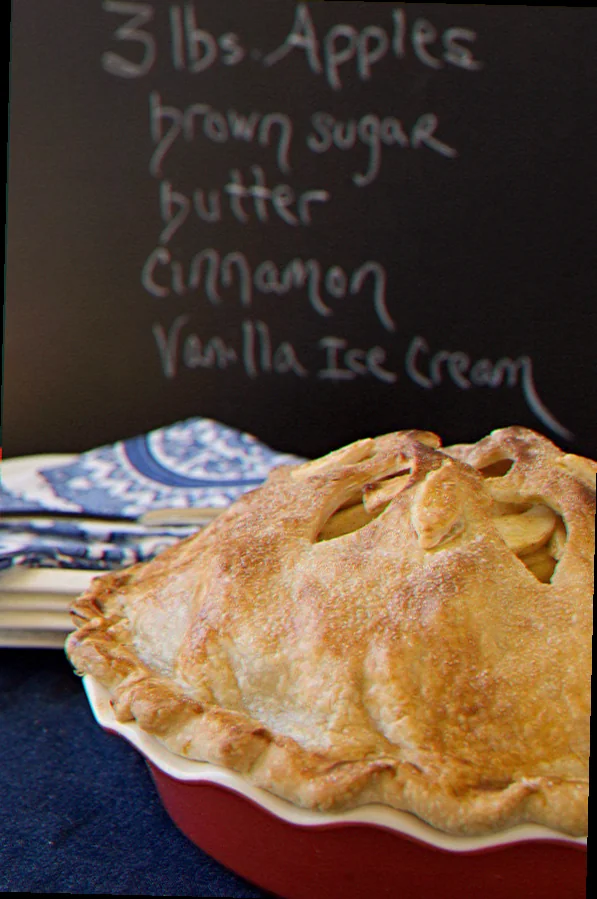
Before diagnosing your failure, you must understand the benchmark. A successful apple pie is a feat of engineering where the fruit is suspended in a translucent, jam-like syrup, and the pastry remains crisp enough to shatter upon impact.
| Stage | Success marker — what you should see / feel / smell / hear |
|---|---|
| Raw Assembly | Dough is marbled with visible, pea-sized chunks of cold butter; apples are coated but not swimming in liquid. |
| Mid-Cook (45 mins) | The aroma of toasted butter and cinnamon fills the room; juices are visible through the vents, bubbling lazily. |
| At the Finish | The internal temperature of the filling reaches 90°C–93°C; the crust is a deep, uniform mahogany gold. |
| When Serving | A clean vertical slice; the bottom crust is rigid and dry; apples are tender but offer a slight toothsome resistance. |
The Ingredient Failures — Wrong Choices Before You Even Start Cooking
- The Mushy Pome (Texture Failure): caused by using soft, dessert apples like Red Delicious or McIntosh → fix: use a 50/50 blend of Granny Smith (for structure/acid) and Honeycrisp or Braeburn (for sweetness/firmness).
- The Grease Melt (Crust Failure): caused by using room temperature butter or “spreadable” tubs → fix: use European-style butter (82%+ fat content) chilled to exactly 4°C before cutting into the flour.
- The Clouded Filling: caused by using flour as a thickener, which creates an opaque, pasty mouthfeel → fix: use Instant ClearJel or Cornstarch for a translucent, high-gloss set.
The Technique Failures — What Goes Wrong During Cooking
- The Rubber Disk (Tough Pastry): The crust is hard and chewy rather than flaky. → caused by over-working the dough and developing too much gluten. → fix: mix until the dough just holds together when squeezed; stop before it looks uniform. Use ice-cold vodka (15ml) in place of some water to inhibit gluten.
- The Gap (Shrunken Filling): A large air pocket forms between the top crust and the apples. → caused by the apples softening and shrinking during baking while the crust sets early. → fix: Macerate the apples in sugar for 30 minutes, then reduce the resulting juice on the stove into a syrup before adding it back to the fruit.
- The Soggy Bottom (Moisture Migration): The base of the pie is translucent and limp. → caused by raw fruit juices soaking into the bottom crust before it can sear. → fix: Blind bake the bottom crust for 10 minutes or place the pie dish directly on a preheated baking steel at 218°C for the first 15 minutes of baking.
- The Steam Bomb (Exploding Crust): The top crust bulges or cracks irregularly. → caused by inadequate venting. → fix: cut at least five 2-inch slits in the top crust to allow steam to escape efficiently.
The Equipment Failures — When Your Tools Are the Problem
- Ceramic Pie Dishes: These are slow to conduct heat, often leading to undercooked bottom crusts. → fix: use a tempered glass (Pyrex) dish so you can visually inspect the browning of the bottom, or a heavy-gauge dull metal tin for the fastest heat transfer.
- Hand-Mixing vs. Food Processor: A food processor often pulses the butter too small, leading to a “short” crumbly crust rather than a flaky one. → fix: use a pastry blender or two knives to ensure butter chunks remain the size of peas.
- The Missing Probe: Guessing “doneness” by sight alone. → fix: use a digital instant-read thermometer. The filling must hit 90°C to activate the starches/thickeners.
The Full Recipe — Built Around Preventing Every Failure Above
The Pastry (Failure-Proof Crust):
- All-purpose flour — 350g — provides the protein structure needed to hold the fruit weight.
- Unsalted butter (4°C) — 225g — provides the steam-pockets for flakiness.
- Ice water/Vodka mix — 60–80ml — prevents gluten over-development.
- Fine sea salt — 5g — prevents a bland, “floury” taste.
The Filling (The “Anti-Slump” Mix):
- Firm apples (Peeled/Sliced 6mm) — 1.2kg — ensures the fruit doesn’t turn to sauce.
- Granulated sugar — 150g — draws out excess moisture during maceration.
- Cornstarch — 30g — ensures a stable, sliceable set.
- Cinnamon/Nutmeg — 5g/1g — provides the aromatic profile.
- Lemon juice — 15ml — prevents “The Gray Apple” (oxidation).
Method:
- Cut the fat: Incorporate butter into flour until pea-sized lumps remain — prevents a “Concrete Crust” — success marker: dough looks like coarse wet sand with flat bits of butter.
- Hydrate: Add liquid 10ml at a time — prevents “The Rubber Disk” — success marker: dough is shaggy and barely holds when pressed. Chill for 1 hour.
- Macerate: Toss apples with sugar and lemon; let sit for 30 mins — prevents “The Gap” — success marker: 50–100ml of liquid collected at the bottom of the bowl.
- The Syrup Reduction: Drain the apple liquid into a pan and boil until syrupy; pour back over apples with cornstarch — prevents “The Soup Slump” — success marker: apples look glazed and sticky.
- Assembly: Roll dough to 3mm thickness; fill and vent — prevents “The Steam Bomb” — success marker: vents are clear and unobstructed.
- The Heat Blast: Bake at 218°C for 15 mins, then drop to 190°C — prevents “The Soggy Bottom” — success marker: bottom crust is set before juices release.
How to Rescue Recipes on Chalkboards Apple Pie When It Has Already Gone Wrong
- If the crust is browning too fast but the filling is cold: Cover the edges or the entire top with aluminum foil (shiny side out). This reflects radiant heat while allowing the internal temp to rise.
- If you forgot the thickener and the pie is “Soupy”: You cannot fix this easily once baked. However, you can vent the pie and continue baking until the juices reduce by half through evaporation, though the apples will be softer.
- If the bottom is pale/doughy after the timer goes off: Move the pie to the lowest oven rack (or the floor of the oven for 3 minutes) to provide a direct blast of heat to the base.
- If the top crust breaks during assembly: Do not re-roll (this causes “The Rubber Disk”). Use a “patchwork” technique by moistening the edges of the break with water and pressing a scrap of dough over it.
Make-Ahead: Which Failures This Introduces and How to Avoid Them
- The Freezer Burn (Storage Failure): occurs when raw pies are frozen without protection → fix: wrap in a double layer of plastic wrap and one layer of foil. Bake from frozen at 190°C, adding 20 minutes to the total time.
- The “Leaking” Fridge Pie: If you assemble the pie and leave it in the fridge overnight, the sugar will continue to pull water from the apples, causing the bottom crust to turn to paste before it even hits the oven. → fix: Never assemble more than 2 hours before baking. Store the dough and the macerated filling separately, then assemble at the last moment.
Related topics: Recipe apple pie crust · Apple cinnamon pie recipe brown sugar · Apple pie tfa recipe
Diagnostic FAQ
My pie turned out with a huge air pocket under the top crust — what went wrong?
This is “The Gap.” You likely used very fresh, crisp apples and didn’t macerate them or pre-cook them. They steamed and shrank in the oven. Next time, let the sliced apples sit in sugar for 30 minutes and discard or reduce the extra juice.
The crust is flaky but tastes like flavorless cardboard — where did I go wrong?
This is a Seasoning Failure. You likely skipped the salt in the dough or used a low-fat “light” butter. Fat carries flavor; use 82% butter and don’t be afraid of the 5g of salt.
Everything looked perfect until I sliced it, then the juice ran everywhere — why?
This is a Thermal Failure. You likely sliced the pie while it was still warm. The starches (cornstarch/ClearJel) do not fully “set” until the pie drops below 40°C. You must wait at least 3 hours after baking before the first slice.