The first time I made Reese peanut butter cups pie recipe, it was a disaster. A beautiful, gooey, chocolate-peanut butter disaster. It was Thanksgiving, a high-stakes occasion for me, and I wanted to impress. I’d seen pictures, heard the rave reviews, and figured, how hard could it be? Turns out, very. The filling was a grainy mess, the crust had the structural integrity of a sandcastle in a hurricane, and the whole thing tasted… off. It wasn’t the divine, silky, decadent experience I’d envisioned. It took me years of tinkering, of burnt sugar, of curdled cream cheese, and one glorious, blinding epiphany – tempering the chocolate – to finally get it right.
Why Most Versions of Reese Peanut Butter Cups Pie Fail
Most people, bless their hearts, try to make this pie by simply melting chocolate and stirring it into everything else. It’s the lazy shortcut. They’ll melt some chocolate chips – usually the waxy, stabilizer-filled kind – dump them into the peanut butter and cream cheese mixture, maybe add some whipped cream, and call it a day. What you get is a pie that’s often grainy, dull in flavor, and texturally confused. The chocolate seizes up, or it’s just this greasy, indistinct sludge that coats your mouth. It lacks that deep, resonant chocolate flavor and the smooth, luxurious mouthfeel that makes a Reese’s Peanut Butter Cup so utterly addictive. My early attempts were exactly this: a gritty, greasy imposter that dared to wear the name of my beloved candy.
The Ingredients That Actually Matter
Forget those standard grocery store chocolate chips. For the chocolate ganache, I’ve landed on high-quality bittersweet chocolate, specifically a 70% cacao. I use 240g of it, chopped finely. This isn’t just about sweetness; it’s about the complex, slightly bitter notes that cut through the richness. Anything less than 60% cacao and the pie becomes cloying. For the peanut butter, it has to be creamy, unsalted peanut butter, and I use a full 320g. No chunky stuff, no reduced-fat nonsense that’s mostly sugar and oil. The unsalted part is crucial; it lets you control the salt level perfectly. And the cream cheese? Full-fat block cream cheese, 450g, softened to room temperature. Never the spreadable kind in a tub. It’s got too much water, and it’ll make your filling watery. I also use about 120ml of heavy whipping cream for the ganache, and for the filling, about 80g of powdered sugar to ensure that silken texture without any grittiness. And, of course, a whole bag, about 350g, of Reese’s Peanut Butter Cups, chopped. These are the stars, and they deserve to be treated as such.
The Moment Everything Changes: Tempering the Chocolate
The single, life-altering insight that transformed my Reese peanut butter cups pie recipe from a sad imitation to a showstopper was learning to temper the chocolate for the ganache. Before this, I was just melting it. Big mistake. When you just melt chocolate, you’re essentially breaking down its delicate crystal structure. When it cools, it re-crystallizes haphazardly, leading to that grainy texture and dull sheen. Tempering involves carefully heating and cooling the chocolate to encourage the formation of stable cocoa butter crystals. This creates a ganache that is incredibly smooth, glossy, and snaps when you bite into it (though in a pie, it’s more of a velvety yielding). It’s the difference between chalk and silk. The science is simple: controlled heating and cooling coax the chocolate into its most stable, happiest form.
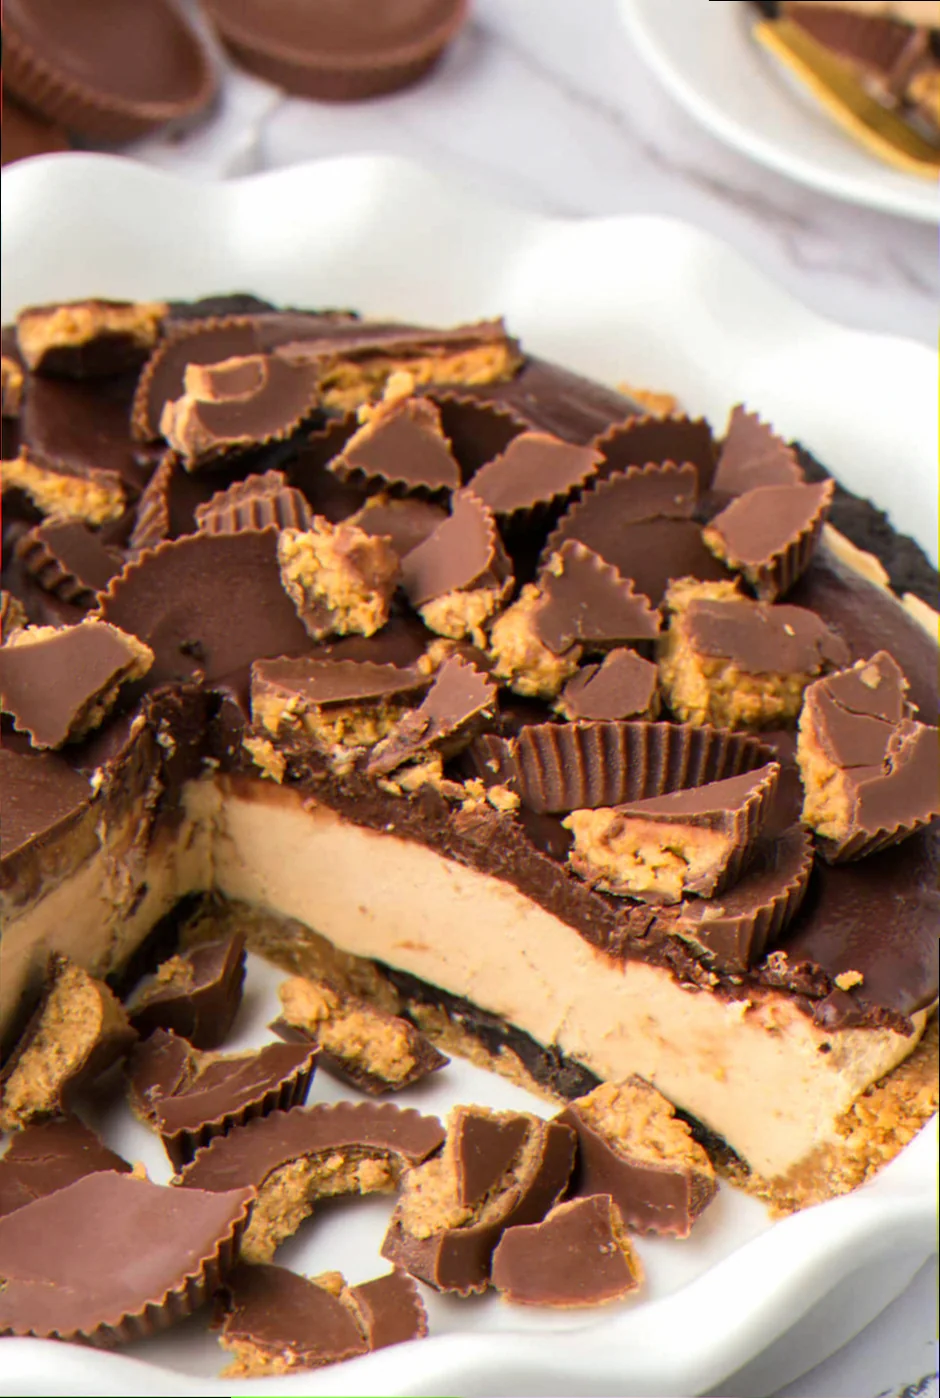
How I Actually Make It Now — Step by Step
The Crust Foundation: I start with a no-bake oreo crust. I pulse about 250g of Oreos, crumbs and filling included, in a food processor until they’re fine. Then, I mix in 80g of melted unsalted butter. I press this mixture firmly into the bottom and up the sides of a 9-inch pie plate. This is where people often mess up – not pressing it hard enough. You want a compact base that won’t crumble when you slice it. I chill this in the freezer for at least 15 minutes while I make the filling.
The Dreamy Peanut Butter Filling: In a large bowl, I beat the softened 450g of cream cheese until it’s completely smooth and lump-free. This is non-negotiable. Then, I add the 320g of creamy peanut butter and beat them together until they’re light and airy. Next, I gradually add the 80g of powdered sugar, mixing until just combined. I pour in the 120ml of heavy whipping cream and beat on medium speed until the mixture is thick and glossy, like a very dense mousse. I don’t want any streaks of cream cheese or peanut butter. It should be a uniform pale tan.
The Ganache Revelation (Tempering): This is the crucial part. I melt 240g of finely chopped 70% bittersweet chocolate with 60ml of heavy whipping cream over a double boiler, stirring constantly until it’s smooth and just melted. Then, I remove it from the heat and stir in a teaspoon of vanilla extract. The magic happens next: I let it cool slightly, about 5 minutes, then I whisk it vigorously until it’s glossy and slightly thickened. You’re looking for it to coat the back of a spoon beautifully. This is where the stable crystals form. If it looks dull or oily, you’ve gone too far or not far enough.
Assembly and the Stars: I gently fold about half of the chopped Reese’s Peanut Butter Cups into the peanut butter filling. Then, I spoon this luscious mixture into the chilled crust, spreading it evenly. Now, I carefully pour the tempered chocolate ganache over the top, letting it cascade down the sides. It should be pourable but not watery. Finally, I arrange the remaining chopped Reese’s Peanut Butter Cups decoratively on top of the ganache before it sets.
The Chill: This pie needs to chill properly. I refrigerate it for at least 4 hours, but overnight is best. This allows the flavors to meld and the structure to set. Rushing this step is like building a house without letting the cement dry.
The Failures I Still See — and How to Fix Them
- Grainy Filling: This is almost always down to not softening the cream cheese enough, or over-beating the powdered sugar into it. Fix: Ensure your cream cheese is truly at room temperature. Beat it until it’s utterly smooth before adding anything else.
- Greasy, Dull Ganache: This is the direct result of skipping the tempering step. Fix: Learn to temper chocolate. It’s not as hard as it sounds, and the difference is night and day. If you’re truly intimidated, use a good quality bar chocolate and melt it slowly and carefully, never letting it get too hot.
- Crumbly Crust: This happens when the crust isn’t pressed firmly enough into the pie plate. Fix: Use the bottom of a measuring cup or a flat-bottomed glass to press the crumb mixture down, really compacting it against the plate and up the sides.
When I Make This and What I Serve It With
This Reese peanut butter cups pie recipe is my ultimate crowd-pleaser for casual gatherings. It’s the star of summer barbecues, potlucks, or just a really good Friday night movie marathon. It’s pure, unadulterated joy on a plate. I often serve it alongside a simple grilled steak – the savory richness of the steak is a perfect counterpoint to the sweet, chocolatey pie. For a lighter option, a big green salad with a tangy vinaigrette cuts through the richness beautifully. And to drink? A cold glass of milk, naturally. It’s the ultimate nostalgic pairing.
Substitutions I’ve Tested Honestly
- Regular Peanut Butter Cups → Mini Reese’s Peanut Butter Cups: What I actually tried was just using the standard-sized ones and chopping them, which works fine. Using the mini ones is easier for even distribution, but the flavor is the same. Honest verdict: Both work, mini are just more convenient.
- Bittersweet Chocolate → Semi-Sweet Chocolate: Tested result: It works, but the pie becomes noticeably sweeter and loses that sophisticated depth. When it’s acceptable: If you only have semi-sweet and absolutely must make the pie, it’s better than no pie, but I’d reduce the powdered sugar in the filling by about 20g.
- Dietary swap (Vegan): I’ve tried using vegan cream cheese and vegan chocolate. It… barely passes. The texture is never quite as smooth, and the vegan chocolate often has a different melting point, making the ganache a bit trickier to handle. It’s a decent attempt for those who need it, but it doesn’t capture the magic of the original.
Questions I Get Asked About Reese Peanut Butter Cups Pie
Can I make this ahead of time?
Absolutely. In fact, I highly recommend it. This pie needs to chill for at least 4 hours, and it’s even better made the day before. The flavors deepen, and the textures meld beautifully. It’s the perfect make-ahead dessert.
Related topics: Recipe for reese peanut butter pie · Yummy apple pie recipe · Mason woodruff pumpkin pie cheesecake recipe
My ganache looks dull, what did I do wrong?
This is the tell-tale sign of untempered chocolate. You either overheated it, cooled it too much before whisking, or didn’t whisk it long enough. The key is to get it to that glossy, slightly thickened stage where it coats the back of a spoon smoothly. Don’t be afraid to whisk it vigorously.
My filling is too soft, even after chilling. What’s the fix?
This almost always comes down to using tub cream cheese, which has more water content, or not using enough cream cheese in proportion to the other wet ingredients. Always use full-fat block cream cheese, and stick to the measurements. If it’s still too soft, you might have to let it firm up in the freezer for 30 minutes before serving, but it’s not ideal.