Serious Pie Biscuit Recipe: A Diagnostic Guide
Your Serious Pie biscuits are flat, tough, and have a distinctively rubbery texture. You’re not alone. This guide will diagnose every possible failure point in the Serious Pie biscuit recipe, from ingredient selection to final bake, and provide precise, actionable fixes to ensure your next attempt is a triumph.
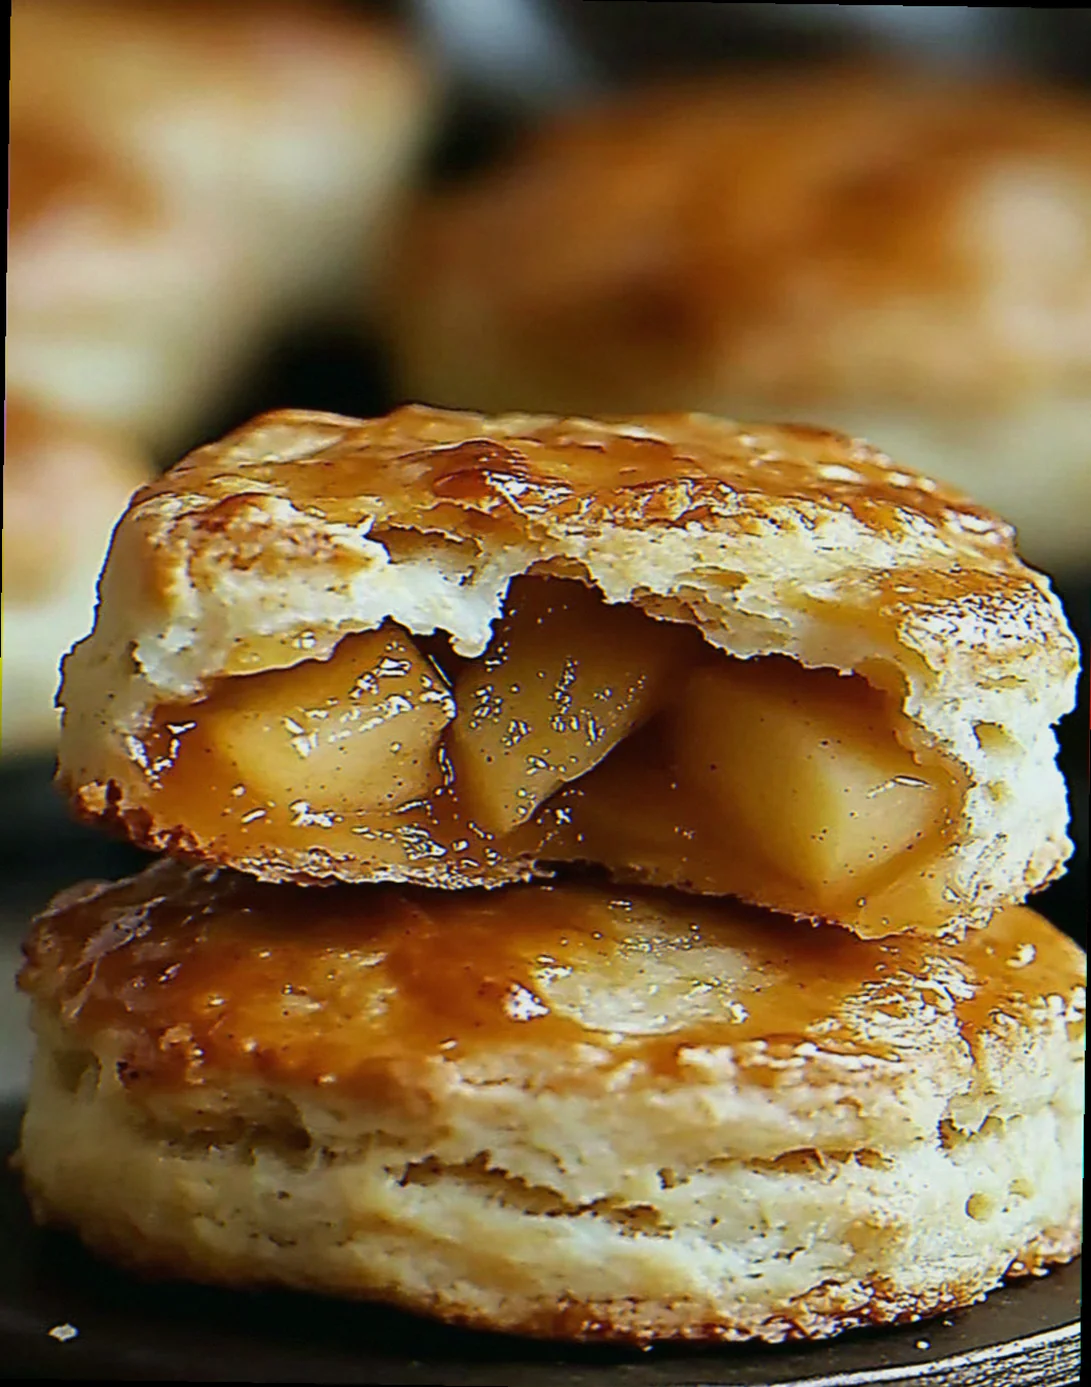
What Perfect Serious Pie Biscuits Actually Look, Feel, and Taste Like
The goal is a biscuit that is simultaneously tender and sturdy, with a deeply browned, slightly crisp exterior and a fluffy, moist interior.
| Stage | Success marker — what you should see / feel / smell / hear |
|---|---|
| Before cooking | Dough is shaggy but cohesive, not sticky or dry. It should feel cool and slightly yielding to the touch. No raw flour pockets should be visible. |
| During cooking (approx. 15-20 minutes) | Biscuits will visibly puff up, reaching heights of at least 3-4 cm. The tops will turn a deep, golden brown, with edges showing a darker, almost mahogany hue. A faint aroma of toasted butter and flour will fill the kitchen. Internal temperature should reach 96-98°C. |
| At the finish | Biscuits are tall, with distinct, flaky layers visible when gently pressed. They feel light for their size and spring back slightly. The aroma is rich and buttery. |
| When serving | A gentle pull apart reveals a steamy, airy interior. The texture is tender, slightly crumbly, and moist, never dry or doughy. The flavour is a balanced symphony of rich butter, sweet flour, and a hint of salt. |
The Ingredient Failures — Wrong Choices Before You Even Start Cooking
- Flat Rise: caused by all-purpose flour with too low protein content (below 10%). The lower protein structure can’t support the leavening agents effectively. → fix: Use unbleached all-purpose flour with a protein content of 10-12%.
- Rubbery Texture: caused by over-worked butter, melted butter, or butter too warm. This leads to gluten development and a greasy, dense crumb. → fix: Ensure your unsalted butter is very cold, cut into small cubes (approx. 1cm), and no warmer than 4°C.
- Seized Chocolate (if applicable to a specific variation): caused by using chocolate chips or chunks with a high melting point or adding them to a hot mixture. → fix: Use high-quality chopped dark chocolate (60-70% cacao) or chocolate discs specifically designed for melting. Ensure the dough is completely cooled before folding in chocolate.
- Soggy Bottom: caused by using liquid milk instead of buttermilk or a milk substitute with low acidity. Insufficient acidity weakens the gluten structure and prevents proper browning. → fix: Always use full-fat buttermilk, or make a homemade substitute by adding 1 tbsp white vinegar or lemon juice to 240ml whole milk and letting it sit for 5 minutes.
The Technique Failures — What Goes Wrong During Cooking
- Flat Rise: what it looks like — sad, deflated discs. → caused by over-mixing the dough once the liquid is added. This over-develops gluten, hindering the rise. → fix: Mix the wet and dry ingredients just until combined. The dough should still look shaggy, with visible dry bits. Do not stir vigorously or for more than 30 seconds.
- Rubbery Texture: symptom — biscuits are dense, tough, and chewy. → cause — excessive kneading or shaping of the dough. Aggressive handling develops gluten and compresses the biscuit structure. → fix: Handle the dough as little as possible. Pat it out gently to the specified thickness (approx. 2cm) and cut biscuits with a straight, downward press of a biscuit cutter. Do not twist the cutter.
- Soggy Bottom: symptom — the bottom crust is pale, soft, and sticks to the baking sheet. → cause — dough too wet, or baking on a cold, uninsulated baking sheet. → fix: Ensure your dough is properly hydrated (see Ingredient Failures). Bake on a preheated baking sheet or an insulated baking sheet (two stacked together) at 220°C. For extra insurance, line the baking sheet with parchment paper.
- Split Sauce (if a filling is involved): symptom — the filling oozes out during baking, creating a mess. → cause — filling is too thin, or the biscuit dough is too thin and doesn’t create a sufficient barrier. → fix: Thicken your filling with a cornstarch slurry (1 tbsp cornstarch to 2 tbsp cold water) and ensure your biscuit dough is at least 2cm thick to create a robust lid.
The Equipment Failures — When Your Tools Are the Problem
- Flat Rise: Using a standard metal baking sheet without insulation. This can lead to uneven heat distribution and a less vigorous rise. → what to use instead: An insulated baking sheet (two standard sheets stacked) or a dark, heavy-gauge baking sheet. → why it matters: Even, consistent heat is crucial for a good rise and even browning.
- Rubbery Texture: Using a metal biscuit cutter and twisting it. Twisting seals the edges, preventing the biscuit from rising evenly. → the failure it produces: Uneven rise and tight, tough edges. → the fix: Use a straight-sided biscuit cutter and press straight down. → the workaround if unavailable: A sharp knife can be used to cut squares, but this often leads to a less tender biscuit.
- Soggy Bottom: A thin, flimsy baking sheet. This can result in insufficient heat reaching the bottom of the biscuit. → the failure it produces: Pale, undercooked bottoms. → acceptable substitute: Two standard baking sheets stacked together provide insulation, mimicking an insulated sheet.
The Full Recipe — Built Around Preventing Every Failure Above
- 240g Unbleached All-Purpose Flour (10-12% protein) — the precise flour protein content prevents flat rise and ensures structure.
- 10g Baking Powder (double-acting) — for leavening.
- 4g Fine Sea Salt — enhances flavour and controls gluten development.
- 115g Unsalted Butter, VERY COLD (4°C), cut into 1cm cubes — the cold temperature and small size prevent over-working and ensure flaky layers.
- 180ml Full-Fat Buttermilk (room temperature, ~20°C) — the acidity helps tenderize the dough and promotes a better rise. If unavailable, use the homemade substitute (1 tbsp white vinegar to 240ml whole milk, let sit 5 mins).
- Optional: 100g High-Quality Chopped Dark Chocolate (60-70% cacao) — ensures smooth integration and prevents seizing if dough is cooled.
Method:
- Preheat your oven to 220°C (200°C fan/gas mark 7) — this high initial heat is crucial for a rapid, full rise.
- In a large bowl, whisk together the flour, baking powder, and salt — this ensures dry ingredients are evenly distributed, preventing pockets of under-leavening. Success marker: A uniform, pale powder.
- Add the cold butter cubes to the flour mixture — working quickly, use your fingertips or a pastry blender to cut the butter into the flour until the mixture resembles coarse crumbs with some pea-sized pieces of butter remaining. Success marker: Visible butter pieces, no dry flour. This is where you prevent rubbery texture by ensuring distinct fat pockets for flakiness.
- Pour in the buttermilk — using a fork or spatula, gently mix until just combined. The dough should still look shaggy, with some dry flour visible. Do not overmix. Success marker: A shaggy, cohesive mass, not a smooth paste. This prevents flat rise by avoiding gluten development.
- Turn the dough out onto a lightly floured surface — gently pat it into a rectangle approximately 2cm thick. Success marker: A slightly sticky, but manageable dough that holds its shape. This prevents rubbery texture by minimizing handling.
- Cut biscuits using a straight-sided biscuit cutter (approx. 5cm diameter) — press straight down; do not twist. Rework scraps minimally. Success marker: Tall, distinct biscuit shapes. This prevents flat rise and rubbery texture.
- Place biscuits on a preheated, lightly greased, or parchment-lined insulated baking sheet — ensure they are touching for maximum rise or spaced slightly apart for crispier edges. Success marker: Uniformly shaped biscuits ready for baking. This prevents soggy bottom.
- Bake for 15-20 minutes, or until deeply golden brown and puffed up. Success marker: Height of at least 3-4cm, rich mahogany edges, internal temperature of 96-98°C. This ensures perfect texture and finish.
How to Rescue Serious Pie Biscuits When They Have Already Gone Wrong
- If your biscuits are flat and dense (flat rise/rubbery texture): Sadly, these are difficult to rescue. They are likely over-mixed or the gluten has been over-developed. You can try to salvage them by warming them slightly and serving with a generous amount of gravy or a sweet compote to add moisture and mask the texture.
- If your biscuits have a soggy bottom: Carefully remove them from the baking sheet. Place them directly on the oven rack for the last 5 minutes of baking to allow air to circulate and crisp up the bottoms. This is a partial fix; the texture may not be as tender.
- If the filling has split (if applicable): This is a catastrophic failure for the filling. You can try to scoop out the filling and reheat it separately, then serve it alongside the biscuits. The biscuits themselves may still be salvageable.
Make-Ahead: Which Failures This Introduces and How to Avoid Them
Making Serious Pie biscuits ahead of time primarily introduces the failure of loss of crispness and tenderness.
- Cause: Moisture migration from the interior to the exterior crust during storage.
- Fix: Bake the biscuits and allow them to cool completely on a wire rack. Once fully cool, store them in an airtight container lined with paper towels at room temperature for up to 24 hours. Reheat them in a 180°C oven for 5-7 minutes to restore crispness. Do not refrigerate unless absolutely necessary; if so, reheat for slightly longer.
Related topics: Paleo pumpkin pie recipe · Recipe for reese peanut butter pie · Recipe for cheeseburger pie without bisquick
Diagnostic FAQ — Real Failures, Real Fixes
My Serious Pie biscuits turned out pale and doughy in the middle, but browned on top. What went wrong?
This is a classic soggy bottom failure. The most likely cause is insufficient heat reaching the base of the biscuit. For next time, ensure your oven is fully preheated, use an insulated baking sheet, and consider placing the biscuits on the middle or lower-middle rack.
They looked right but tasted bland and a bit floury. Where did I go wrong?
This points to an issue with ingredient quality or proportion. Either your salt quantity was too low, or your flour wasn’t properly incorporated with the leavening agents. For your next attempt, double-check the salt measurement and ensure you whisk the dry ingredients thoroughly before adding butter and liquid.
Everything looked perfect until I cut them, and they deflated immediately. Why did it happen?
This is a flat rise failure that occurred during the cutting stage. It’s likely the dough was too warm, too wet, or you handled it too much after adding the liquid. Ensure your butter and liquids are very cold, and handle the dough as little as possible when patting and cutting. If the dough becomes warm during cutting, pop it back in the refrigerator for 10-15 minutes before proceeding.