I spent three years producing what I can only describe as “fruit-filled damp socks” before I realized that the enemy of a perfect turnover wasn’t the oven temperature or the dough—it was the invisible water hidden inside the fruit. The first time I made a turnover recipe with pie crust, I followed a generic blog post that told me to just “toss chopped apples with sugar and bake.” The result was a culinary crime: the bottom crust was a raw, grey paste, the filling had leaked out into a burnt sugary lake on the tray, and the top was a sad, deflated flap. I was devastated. It took dozens of soggy failures for me to arrive at the Chilled Maceration Drain, the single revelation that transformed my turnovers from amateurish messes into shattered-glass-crispy masterpieces that actually hold their shape.
Why Most Versions of Apple Turnovers Fail
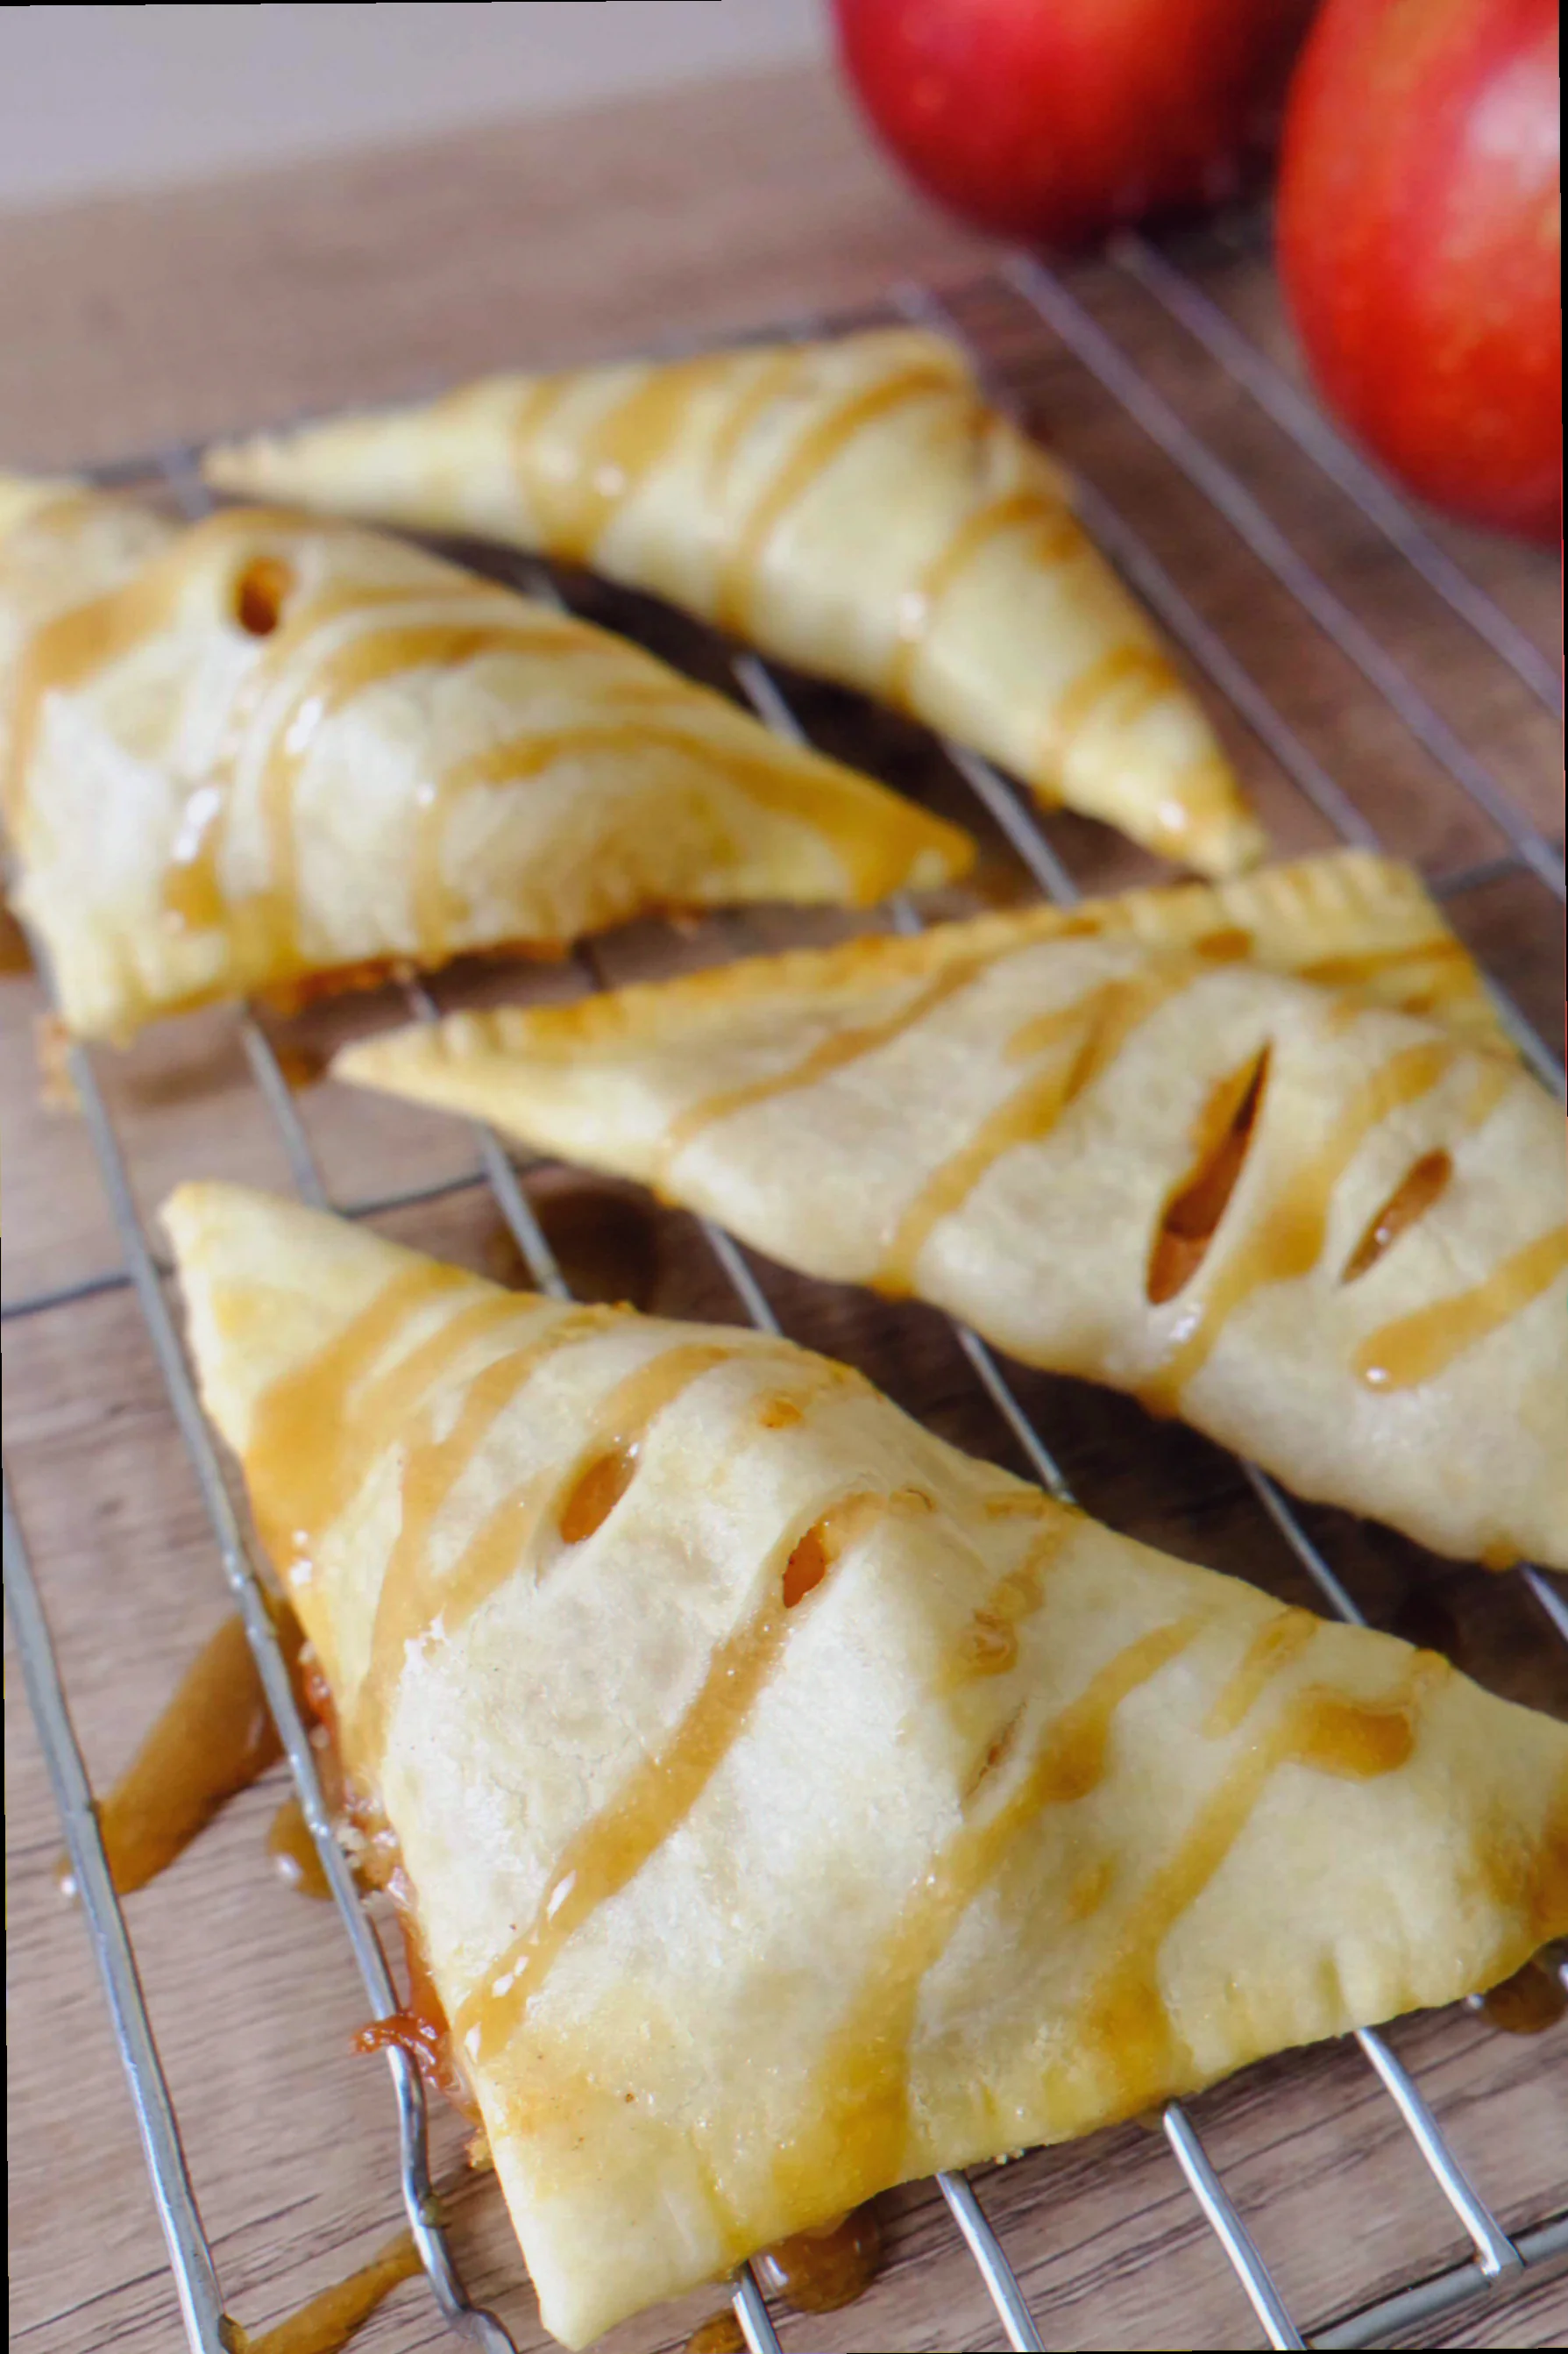
The “wrong way” that almost everyone tries first is what I call the “Stewed Mush Approach.” Most recipes tell you to either pre-cook your filling into a jammy glop or, worse, throw raw fruit straight into the dough. If you pre-cook the apples until they are soft, you lose all texture; you’re essentially eating an empanada filled with baby food. If you put them in raw without treatment, they release a massive amount of juice the second they hit the heat. This steam has nowhere to go, so it blows the seams open or soaks the bottom crust until it’s structural mush. A real turnover should have a “shatter factor”—a crust so crisp it makes a mess of your shirt, protecting a filling that is tender but still has the distinct, toothsome bite of individual fruit pieces. If your turnover doesn’t crunch when you bite the corner, you haven’t made a turnover; you’ve made a wet pocket.
The Ingredients That Actually Matter
I’ve learned that the hero of the filling is the Granny Smith apple, and I won’t hear arguments for anything else. I use exactly 450g of Granny Smiths, peeled and diced into 1cm cubes. I tried Honeycrisps once—too much water. I tried Galas—too sweet and they turned to dust. The Granny Smith has the pectin levels and the acidity (which I bolster with 15ml of fresh lemon juice) to stand up to the heat.
Then there is the fat. I’ve experimented with shortening, but it leaves a film on the roof of your mouth that feels like eating a candle. I use 225g of high-fat European-style butter for the dough, which must be at exactly 4°C when it hits the flour. For the sweetener, I’ve moved away from plain white sugar in the filling. I use 60g of light brown sugar for that molasses depth, paired with 5g of ground cinnamon and a tiny, non-negotiable 2g of kosher salt. The salt is what makes the apple taste like apple rather than just “sweet.” Finally, for the exterior, I use 30g of Demerara sugar. The large crystals don’t melt in the oven, providing a textural contrast that makes the pie crust feel like a professional pastry.
The Moment Everything Changes: The Chilled Maceration Drain
The revelation that saved my baking life was understanding that you cannot put “wet” sugar-fruit into dough. The Chilled Maceration Drain is the process of mixing your 450g of diced apples with the 60g of brown sugar and 15ml of lemon juice and letting them sit in a colander over a bowl for at least 45 minutes before they ever touch the crust.
Science explains why this works: the sugar draws the internal moisture out of the apple cells through osmosis. If you skip this, that moisture comes out inside your oven, creating a “steam bomb” that ruptures the pastry. By draining it beforehand, you collect about 50ml of highly concentrated apple syrup. I take that syrup, simmer it in a small pan until it’s thick, and then toss it back with the apples. You get all the flavor, all the sweetness, but zero “free water” to ruin your crust. This is the difference between a soggy failure and a professional-grade turnover.
How I Actually Make It Now — Step by Step
The Cold Integration: I start by pulsing 300g of all-purpose flour with 2g of salt and my 225g of cubed, frozen butter. I am looking for “walnut-sized” chunks, not a fine meal. If the butter gets too small, you lose the flakes. I drizzle in 60ml of ice water, just enough so the dough holds when squeezed. I wrap it and chill it for an hour because a warm dough is a death sentence for lamination.
The Fruit Extraction: While the dough chills, I macerate my 450g of apples with the sugar, cinnamon, and lemon. I let them sit in the colander. I watch the liquid pool in the bowl below—this is the liquid that would have killed my crust. Once I’ve drained it and reduced it to a thick glaze, I fold it back into the fruit. The fruit looks glossy and concentrated, not watery.
The Geometric Cut: I roll the dough out on a chilled surface to about 3mm thickness. I don’t “guess” the shapes. I use a ruler to cut 12cm squares. If the squares are too small, you can’t seal them; if they’re too big, the ratio of crust to fruit is off. I place about 35g of filling—roughly a heaped tablespoon—just off-center.
The Structural Seal: This is where people rush and fail. I paint a thin border of egg wash (one egg beaten with 15ml of water) around the edges. I fold the dough over to create a triangle, then I use a fork to crimp the edges with genuine pressure. You want to see the tines of the fork imprinted clearly. If you don’t seal it like you mean it, the steam will find the path of least resistance and blow the side out.
The Venting and Glazing: I slash two small 1cm vents in the top of each turnover. This is the “chimney” for the minimal steam that remains. I brush the tops generously with the rest of the egg wash and shower them with the 30g of Demerara sugar. The sugar sticks to the wash and creates a crunchy armor.
The High-Heat Blast: I bake these at 200°C for exactly 22 minutes. I don’t use 175°C; that’s for cakes. You need the high heat to flash-boil the water in the butter, which is what creates the “lift” in the pie crust layers. I watch for the juice bubbling through the vents to turn from clear to a thick, golden amber. That’s the sign the starch in the filling has hydrated and thickened.
The Failures I Still See — and How to Fix Them
- The Leaking Volcano: This is when the filling escapes from the sides. It’s caused by overfilling or a weak seal. Next time, use less filling than you think you need—35g is the sweet spot—and ensure your egg wash isn’t so thick that it acts as a lubricant instead of a glue.
- The Pale Ghost: A turnover that looks white or light tan instead of deep gold. This is caused by an oven that’s too cold or skipping the egg wash. Ensure your oven is a true 200°C (use a thermometer!) and don’t be shy with the egg.
- The Shrinking Crust: The turnover pulls back and becomes a weird, rounded shape. This happens because the dough wasn’t rested. If you work the gluten and then bake it immediately, it snaps back like a rubber band. Give the assembled turnovers 15 minutes in the fridge before they go into the oven to let the gluten relax.
When I Make This and What I Serve It With
This is my “Sunday Morning Rain” dish. It’s the thing I make when the weather is miserable and the house needs to smell like cinnamon and toasted butter. It earns its place on the table because it feels like a luxury but uses pantry staples.
I always serve these with a wedge of extra-sharp white cheddar cheese on the side. The salt and funk of the cheese against the tart, sweet apple is a classic pairing that most people ignore to their own detriment. If it’s dessert rather than breakfast, I’ll pair it with a scoop of salted caramel gelato. To drink, it has to be a dry, sparkling hard cider. The carbonation cuts through the heavy butter of the pie crust and cleanses the palate for the next bite.
Substitutions I’ve Tested Honestly
- Fresh Apples → Canned Filling: I tried this once in a moment of desperation. It was a disaster. The canned stuff is far too wet and chemically sweet. It turned the pie crust into a soggy wrapper. Never do this.
- Homemade Crust → Store-bought Pie Sheets: If you are in a rush, a high-quality, all-butter store-bought crust is acceptable, but you must roll it out thinner than it comes in the package. The “deep dish” frozen ones are too thick and will stay gummy in the middle.
- Butter → Vegan Butter/Margarine: I’ve tested this for dairy-free friends. It works, but you lose 50% of the flakiness. Vegan butters have a lower melting point, so the dough becomes greasy very quickly. If you must go vegan, keep everything—including the bowl—in the freezer between steps.
Questions I Get Asked About Apple Turnovers
Do I really need to peel the apples?
Yes. Apple skin doesn’t break down at the same rate as the flesh. In a turnover, the skin becomes a strange, papery ribbon that gets stuck in your teeth. Peel them. Your texture depends on it.
Related topics: Recipe apple pie crust · Littice pie crust recipe · Pie crust recipe com
Can I make the dough in a food processor?
You can, but be careful. Three pulses too many and you’ve turned your flaky crust into a tough shortbread. I prefer using my fingers or a pastry cutter so I can feel the size of the butter chunks. If the butter disappears, the flakes disappear.
Why did my turnovers “deflate” after I took them out?
This usually means you didn’t bake them long enough. The structure of the pie crust needs to “set” through the evaporation of moisture. If they look golden but feel soft, give them another five minutes. They should feel firm and sound hollow when tapped on the bottom. If they deflate, the internal steam turned back into water and soaked the structure. Keep going until they are a deep, dark mahogany.